はじめに
今回の記事では、AppShell の UI をカスタマイズして以下のよ�うな TabBar を遷移した際でも固定されているボタンを実装したいと思います。
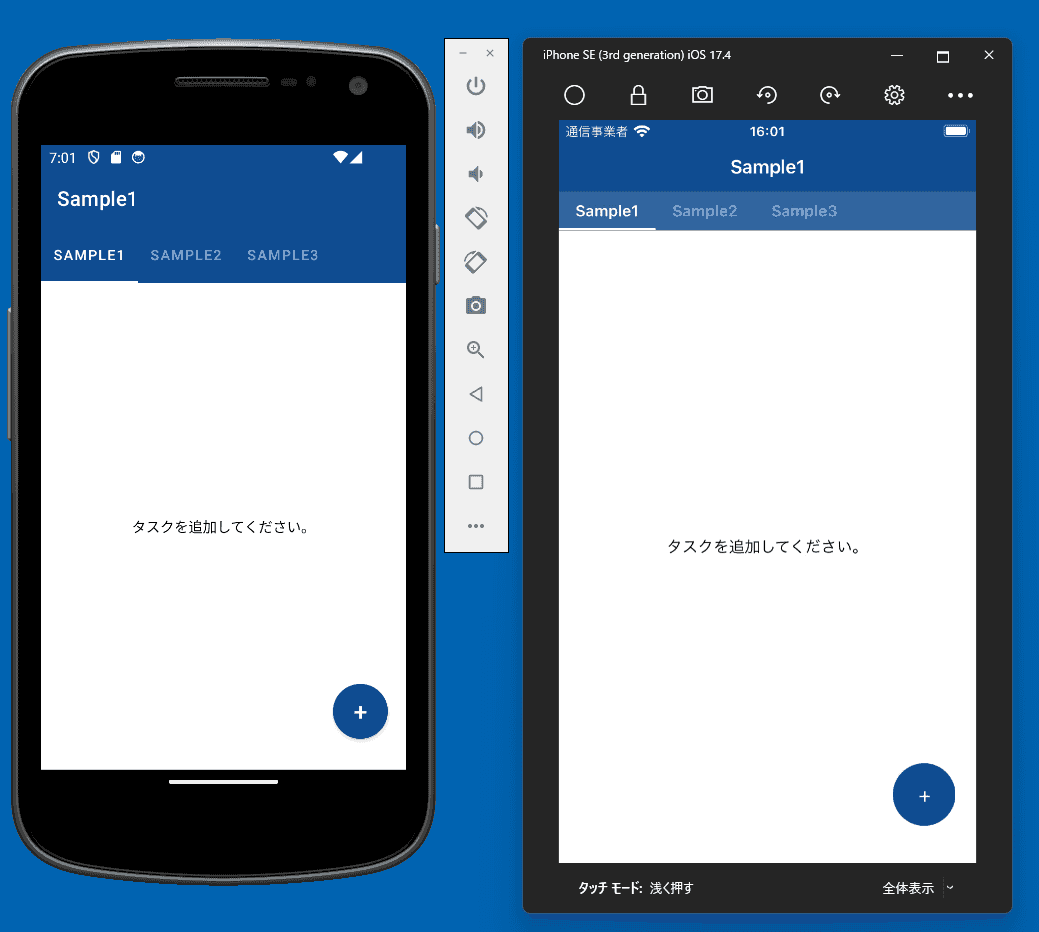
カスタマイズするのは Android と iOS のみとし、Windows や Mac のデスクトップアプリは対象外としています。
また、Visual Studio から iOS のエミュレータを起動する方法などは割愛します。
開発環境
- Windows11
- .NET8
- Visual Studio 2022(Version 17.11.2)
- MacBook Pro(iOS エミュレータの起動用)
必要なライブラリをインストール
プロジェクト作成後、必要なライブラリをインストールします。
今回使用するライブラリは以下になります。
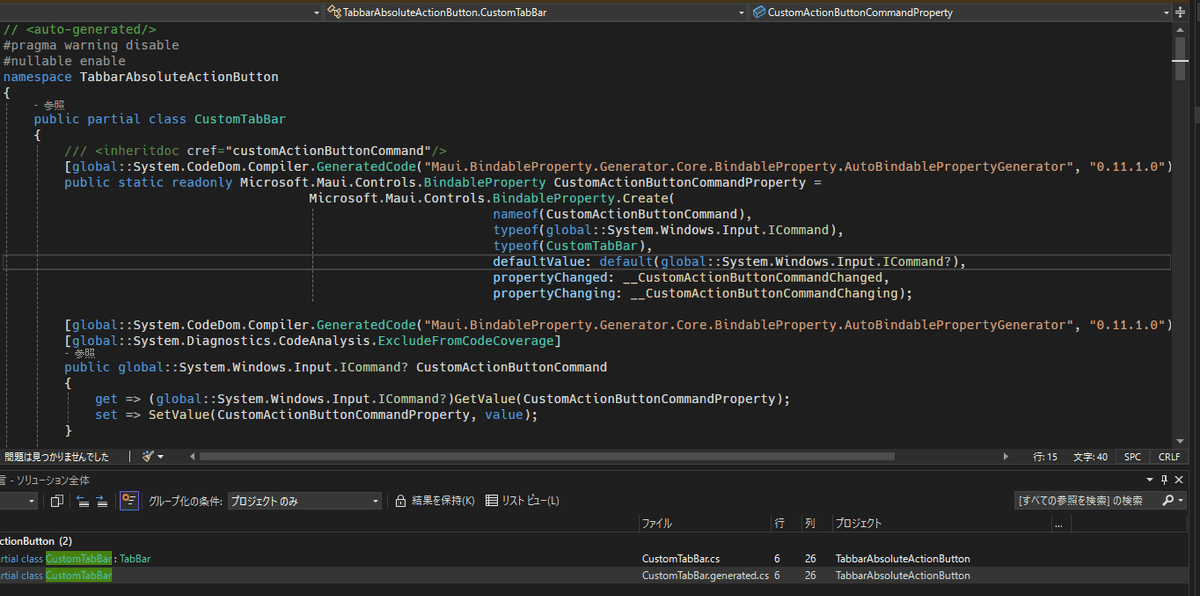
このライブラリは、カスタムコントロールを作成する際に必要なBindablePropertyの作成を簡素化するためのソースジェネレーターです。
本来、公式ドキュメントのサンプルにあるようなBindablePropertyや getter と setter を記述する必要がありますが、簡易的な記述で以下のようなコードを自動で生成してくれます。
また、既にインストールされているライブラリのアップデートがあった場合はアップデートしておきます。

カスタム TabBar を作成する
TabBarを継承したCustomTabBarというクラスを作成します。
using System.Windows.Input;
using Maui.BindableProperty.Generator.Core;

namespace TabbarAbsoluteActionButton
{
    public partial class CustomTabBar : TabBar
    {
        [AutoBindable]
        private ICommand? customActionButtonCommand; // ボタンをクリックした際に実行されるコマンド

        [AutoBindable]
        private string? customActionButtonText; // ボタンに表示させるText

        [AutoBindable]
        private bool customActionButtonVisible; // ボタンの表示・非表示のフラグ

        [AutoBindable]
        public Color? customActionButtonBackgroundColor; // ボタンの背景色

        [AutoBindable]
        private double customActionButtonTextSize; // フォントサイズ
    }
}
次に、各プラットフォームに対応させるためのクラスを作成します。
Android 側の実装
Platforms\Android配下のフォルダにCustomShellHandler.csとCustomShellItemRenderer.csを作成します。
using Microsoft.Maui.Controls.Handlers.Compatibility;
using Microsoft.Maui.Controls.Platform.Compatibility;

// TabbarAbsoluteActionButton.Platforms.Android という名前空間はTabbarAbsoluteActionButtonに修正する
namespace TabbarAbsoluteActionButton
{
    internal class CustomShellHandler : ShellRenderer
    {
        protected override IShellItemRenderer CreateShellItemRenderer(ShellItem item)
        {
            return new CustomShellItemRenderer(this);
        }
    }
}CustomShellItemRenderer.csは以下のように記述します。
using Android.Graphics.Drawables;
using Android.OS;
using Android.Views;
using Android.Widget;
using Microsoft.Maui.Controls.Platform;
using Microsoft.Maui.Controls.Platform.Compatibility;
using Microsoft.Maui.Platform;
using Button = Android.Widget.Button;
using View = Android.Views.View;

// TabbarAbsoluteActionButton.Platforms.Android という名前空間はTabbarAbsoluteActionButtonに修正する
namespace TabbarAbsoluteActionButton
{
    internal class CustomShellItemRenderer : ShellItemRenderer
    {
        private CustomTabBar? _tabBar;
        private int _screenWidth;
        private int _screenHeight;

        public CustomShellItemRenderer(IShellContext shellContext) : base(shellContext)
        { }

        /// <summary>
        /// ShellItemのViewを作成する
        /// </summary>
        /// <param name="inflater"></param>
        /// <param name="container"></param>
        /// <param name="savedInstanceState"></param>
        /// <returns>作成されたView、またはカスタマイズが不要な場合は基本クラスのView</returns>
        public override View? OnCreateView(LayoutInflater inflater, ViewGroup? container, Bundle? savedInstanceState)
        {
            var view = base.OnCreateView(inflater, container, savedInstanceState);

            // カスタムTabBarではなく既存のTabBarを返す場合の条件
            if (Context is null || ShellItem is not CustomTabBar { CustomActionButtonVisible: true } tabBar)
            {
                return view;
            }

            _tabBar = tabBar;
            // TabBarのルートとなるレイアウトを作成
            var rootLayout = CreateRootLayout();
            rootLayout.AddView(view);

            // 画面幅を取得
            GetScreenSize();

            var middleView = CreateCustomActionButton();
            var backgroundView = CreateBackgroundView(middleView.LayoutParameters);

            if (backgroundView != null)
            {
                rootLayout.AddView(backgroundView);
            }
            rootLayout.AddView(middleView);

            return rootLayout;
        }

        /// <summary>
        /// ルートレイアウトとして機能する新しい FrameLayout を作成する
        /// </summary>
        /// <returns>作成された FrameLayout インスタンス</returns>
        private FrameLayout CreateRootLayout()
        {
            return new FrameLayout(Context)
            {
                // LayoutParamsに幅と高さの値を指定
                LayoutParameters = new FrameLayout.LayoutParams(
                        ViewGroup.LayoutParams.MatchParent, // 親のViewと同じサイズになる定数を指定
                        ViewGroup.LayoutParams.MatchParent
                        )
            };
        }

        /// <summary>
        /// 画面のサイズを取得し、フィールドに保存する
        /// </summary>
        private void GetScreenSize()
        {
            var displayMetrics = Context?.Resources?.DisplayMetrics;
            _screenWidth = displayMetrics?.WidthPixels ?? 0;
            _screenHeight = displayMetrics?.HeightPixels ?? 0;
        }

        /// <summary>
        /// カスタムアクションボタンを作成する
        /// </summary>
        /// <returns>設定されたカスタムアクションボタン</returns>
        private Button CreateCustomActionButton()
        {
            // ボタンのサイズを画面幅の割合で指定(例: 画面幅の15%)
            int middleViewSize = (int)(_screenWidth * 0.15);
            var middleViewLayoutParams = CreateMiddleViewLayoutParams(middleViewSize);

            var middleView = new Button(Context)
            {
                LayoutParameters = middleViewLayoutParams,
                Text = _tabBar!.CustomActionButtonText ?? "+",
            };

            SetButtonBackground(middleView, middleViewSize);
            SetButtonTextProperties(middleView);
            SetButtonClickEvent(middleView);

            return middleView;
        }

        /// <summary>
        /// ボタンを表示するViewの位置を設定する
        /// </summary>
        /// <param name="size">ビューのサイズ</param>
        /// <returns>作成されたレイアウトパラメータ</returns>
        private FrameLayout.LayoutParams CreateMiddleViewLayoutParams(int size)
        {
            return new FrameLayout.LayoutParams(size,
                                                size,
                                                GravityFlags.Bottom | GravityFlags.End)
            {
                // マージンも画面サイズに対する割合で指定
                BottomMargin = (int)(_screenHeight * 0.05), // 画面高さの5%
                RightMargin = (int)(_screenWidth * 0.05) // 画面幅の5%
            };
        }

        /// <summary>
        /// ボタンの背景を設定する
        /// </summary>
        /// <param name="button">設定対象のボタン</param>
        /// <param name="size">ボタンのサイズ</param>
        private void SetButtonBackground(Button button, int size)
        {
            var buttonBackgroundDrawable = new GradientDrawable();
            buttonBackgroundDrawable.SetColor(_tabBar!.CustomActionButtonBackgroundColor.ToPlatform(Colors.Transparent));
            buttonBackgroundDrawable.SetShape(ShapeType.Rectangle);
            buttonBackgroundDrawable.SetCornerRadius(size / 2f);
            button.SetBackground(buttonBackgroundDrawable);
        }

        /// <summary>
        /// ボタンのテキストプロパティを設定する
        /// </summary>
        /// <param name="button">設定対象のボタン</param>
        private void SetButtonTextProperties(Button button)
        {
            button.SetTextColor(Android.Graphics.Color.White);
            if (_tabBar!.CustomActionButtonTextSize > 0)
            {
                button.SetTextSize(Android.Util.ComplexUnitType.Sp, (float)_tabBar.CustomActionButtonTextSize);
            }
            button.SetPadding(0, 0, 0, 0);
        }

        /// <summary>
        /// ボタンのテキストプロパティを設定
        /// </summary>
        /// <param name="button">設定対象のボタン</param>
        private void SetButtonClickEvent(Button button)
        {
            button.Click += (_, _) => _tabBar!.CustomActionButtonCommand?.Execute(null);
        }

        /// <summary>
        /// 背景Viewを作成する
        /// </summary>
        /// <param name="layoutParams">レイアウトパラメータ</param>
        /// <returns>作成された背景View、または null(背景色が設定されていない場合)</returns>
        private View? CreateBackgroundView(ViewGroup.LayoutParams layoutParams)
        {
            if (_tabBar!.CustomActionButtonBackgroundColor is null)
            {
                return null;
            }

            var backgroundView = new View(Context)
            {
                LayoutParameters = layoutParams
            };

            var backgroundDrawable = new GradientDrawable();
            backgroundDrawable.SetShape(ShapeType.Rectangle);
            backgroundDrawable.SetCornerRadius(((FrameLayout.LayoutParams)layoutParams).Width / 2f);
            backgroundDrawable.SetColor(_tabBar.CustomActionButtonBackgroundColor.ToPlatform(Colors.Transparent));
            backgroundView.SetBackground(backgroundDrawable);

            return backgroundView;
        }
    }
}コメントにも書いてますが、注意点としてTabbarAbsoluteActionButton.Platforms.Androidという名前空間を修正します。
AndroidやiOSなどの固有のプラットフォームの名前空間を指定していると使用先で#if Androidなどの記述を追記しないとコンパイルエラーになるためです。
次に作成した Handler を登録してAppShell.xamlでCustomTabBarを表示させます。
using Microsoft.Extensions.Logging;

namespace TabbarAbsoluteActionButton
{
    public static class MauiProgram
    {
        public static MauiApp CreateMauiApp()
        {
            var builder = MauiApp.CreateBuilder();
            builder
                .UseMauiApp<App>()
+               .ConfigureMauiHandlers(handlers =>
+               {
+                   handlers.AddHandler<Shell, CustomShellHandler>();
+               })
                .ConfigureFonts(fonts =>
                {
                    fonts.AddFont("OpenSans-Regular.ttf", "OpenSansRegular");
                    fonts.AddFont("OpenSans-Semibold.ttf", "OpenSansSemibold");
                });

#if DEBUG
    		builder.Logging.AddDebug();
#endif

            return builder.Build();
        }
    }
}
<?xml version="1.0" encoding="UTF-8" ?>
<Shell x:Class="TabbarAbsoluteActionButton.AppShell"
       xmlns="http://schemas.microsoft.com/dotnet/2021/maui"
       xmlns:x="http://schemas.microsoft.com/winfx/2009/xaml"
       xmlns:local="clr-namespace:TabbarAbsoluteActionButton"
       Title="TabbarAbsoluteActionButton"
       Shell.FlyoutBehavior="Disabled">

    <local:CustomTabBar CustomActionButtonBackgroundColor="#104C91"
                        CustomActionButtonCommand="{Binding CustomActionButtonCommand}"
                        CustomActionButtonText="+"
                        CustomActionButtonTextSize="24"
                        CustomActionButtonVisible="True"
                        Route="Top">

        <Tab Title="Home">
            <ShellContent Title="Sample1" ContentTemplate="{DataTemplate local:MainPage}" />
            <ShellContent Title="Sample2" ContentTemplate="{DataTemplate local:MainPage}" />
            <ShellContent Title="Sample3" ContentTemplate="{DataTemplate local:MainPage}" />
        </Tab>
    </local:CustomTabBar>

</Shell>
ViewModel を作成してCommunityToolkit.Mvvmの様なライブラリを指定しても良いですが、今回 Command には簡易的な処理だけ指定しておきます。
using System.Windows.Input;

namespace TabbarAbsoluteActionButton
{
    public partial class AppShell : Shell
    {
        public ICommand CustomActionButtonCommand { get; }
            = new Command(async () => await Current.DisplayAlert("タイトル", "Hello World", "OK"));

        public AppShell()
        {
            InitializeComponent();
            BindingContext = this;
        }
    }
}初期状態ではロゴなどが表示されているMainPage.xamlとコードビハインドのクリックイベントの処理なども修正します。
<?xml version="1.0" encoding="utf-8" ?>
<ContentPage x:Class="TabbarAbsoluteActionButton.MainPage"
             xmlns="http://schemas.microsoft.com/dotnet/2021/maui"
             xmlns:x="http://schemas.microsoft.com/winfx/2009/xaml">

    <ScrollView>
        <Grid>
            <StackLayout HorizontalOptions="Center"
                         Orientation="Horizontal"
                         VerticalOptions="Center">
                <Label HorizontalOptions="Center"
                       Text="タスクを追加してください。"
                       VerticalOptions="Center" />
            </StackLayout>
        </Grid>
    </ScrollView>

</ContentPage>namespace TabbarAbsoluteActionButton
{
public partial class MainPage : ContentPage
{
public MainPage()
{
InitializeComponent();
}
// 不要なコードを削除
}
}一度動作確認をします。
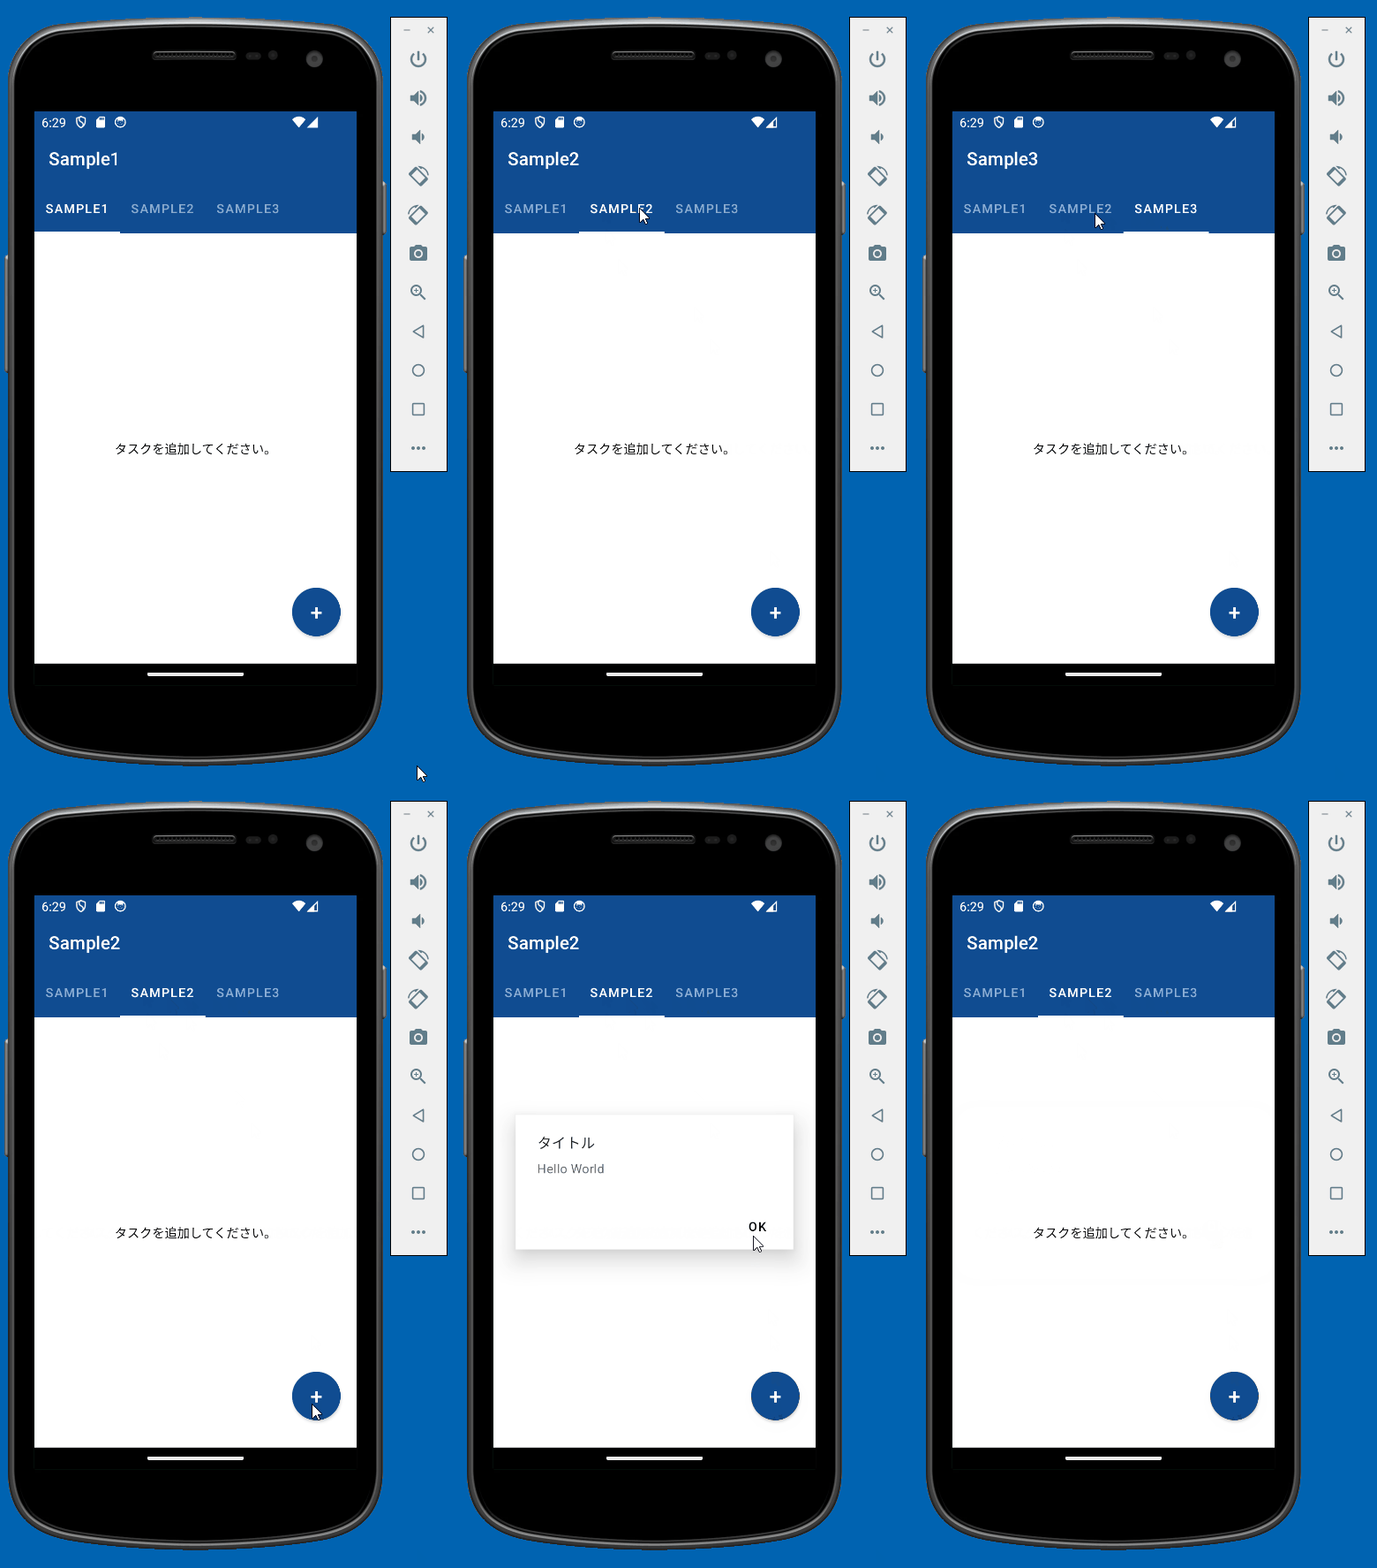
タブが切り替わっても固定されているボタンが表示されました。
iOS 側の実装
iOS 側も同様にファイルを作成します。
using Microsoft.Maui.Controls.Handlers.Compatibility;
using Microsoft.Maui.Controls.Platform.Compatibility;

namespace TabbarAbsoluteActionButton
{
    internal class CustomShellHandler : ShellRenderer
    {
        protected override IShellItemRenderer CreateShellItemRenderer(ShellItem item)
        {
            return new CustomShellItemRenderer(this)
            {
                ShellItem = item
            };
        }
    }
}using CoreGraphics;
using Microsoft.Maui.Controls.Platform.Compatibility;
using Microsoft.Maui.Platform;
using UIKit;
namespace TabbarAbsoluteActionButton
{
internal class CustomShellItemRenderer : ShellItemRenderer
{
private UIButton? _middleView;
private CustomTabBar? _tabBar;
private nfloat _screenWidth;
private nfloat _screenHeight;
private nfloat _buttonSize;
public CustomShellItemRenderer(IShellContext context) : base(context)
{ }
public override async void ViewWillLayoutSubviews()
{
base.ViewWillLayoutSubviews();
if (View is null || ShellItem is not CustomTabBar { CustomActionButtonVisible: true } tabBar)
{
return;
}
_tabBar = tabBar;
GetScreenSize();
CreateOrUpdateMiddleView();
PositionMiddleView();
View.AddSubview(_middleView!);
}
/// <summary>
/// 画面のサイズを取得
/// </summary>
private void GetScreenSize()
{
_screenWidth = UIScreen.MainScreen.Bounds.Width;
_screenHeight = UIScreen.MainScreen.Bounds.Height;
_buttonSize = _screenWidth * 0.15f;
}
/// <summary>
/// Vuewを作成または更新する
/// </summary>
private void CreateOrUpdateMiddleView()
{
if (_middleView != null)
{
_middleView.RemoveFromSuperview();
}
else
{
CreateMiddleView();
}
UpdateMiddleViewProperties();
}
/// <summary>
/// ボタンを作成する
/// </summary>
private void CreateMiddleView()
{
_middleView = new UIButton(UIButtonType.Custom);
_middleView.AutoresizingMask = UIViewAutoresizing.FlexibleRightMargin |
UIViewAutoresizing.FlexibleLeftMargin |
UIViewAutoresizing.FlexibleBottomMargin;
_middleView.Layer.MasksToBounds = false;
_middleView.TouchUpInside += (_, _) => _tabBar!.CustomActionButtonCommand?.Execute(null);
}
/// <summary>
/// Viewのプロパティを更新
/// </summary>
private void UpdateMiddleViewProperties()
{
_middleView!.BackgroundColor = _tabBar!.CustomActionButtonBackgroundColor?.ToPlatform();
_middleView.Frame = new CGRect(CGPoint.Empty, new CGSize(_buttonSize, _buttonSize));
_middleView.Layer.CornerRadius = _middleView.Frame.Width / 2;
_middleView.SetTitle(_tabBar.CustomActionButtonText ?? "+", UIControlState.Normal);
_middleView.SetTitleColor(UIColor.White, UIControlState.Normal);
}
/// <summary>
/// Viewの位置を設定
/// </summary>
private void PositionMiddleView()
{
var bottomMargin = _screenHeight * 0.05f;
var rightMargin = _screenWidth * 0.05f;
// 画面の右下に来るように設定
_middleView!.Frame = new CGRect(
_screenWidth - _buttonSize - rightMargin,
_screenHeight - _buttonSize - bottomMargin,
_buttonSize,
_buttonSize
);
}
}
}エミュレータを起動して動作確認をします。
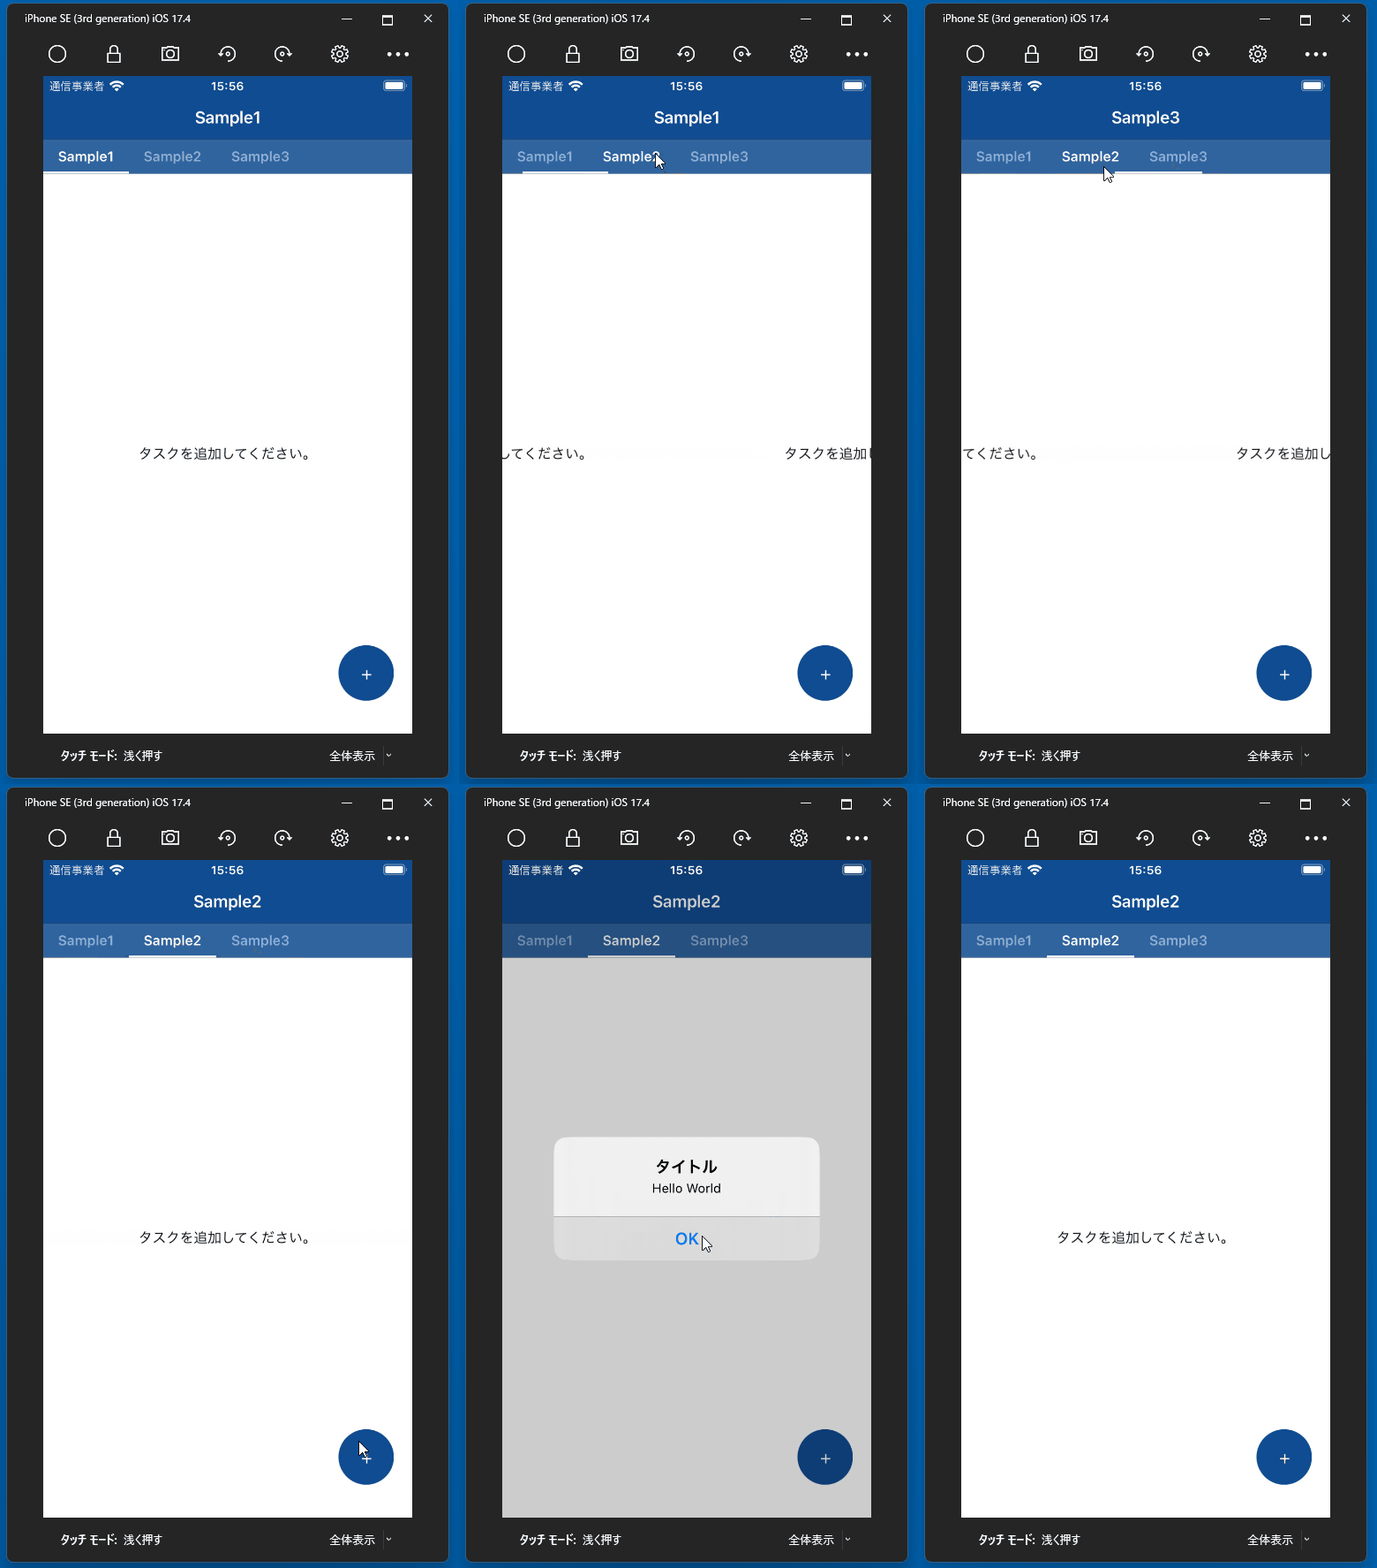
Android 端末と同様にタブが切り替わってもボタンが固定されているのが確認できました。
今回作成したアプリケーションのリポジトリはこちらです。
