

はじめに
今回の記事ではH.NotifyIconというライブラリを使用して、WPF でシステムトレイアイコン(通知アイコン)を表示する方法について記述します。
H.NotifyIcon とは
H.NotifyIcon は、Windows アプリケーションでシステムトレイアイコン(通知アイコン)を簡単に実装するためのライブラリです。GitHub のHavenDV/H.NotifyIconで公開されていて、MIT ライセンスで提供されています。
主な特徴
ざっくり主な特徴です。
- 様々な UI フレームワークのサポート(WPF、WinForms、UWP、MAUI、Uno Platform)
- .NET 6.0 以上をサポート
- WPF の場合、XAML での定義とデータバインディングが可能
- バルーン通知の表示
- カスタムコンテキストメニューの実装
- イベント処理(クリック、ダブルクリックなど)
WindowsForms の NotifyIcon との違い
従来の WPF アプリケーションでは、タスクトレイアイコンを実装するためにSystem.Windows.Forms.NotifyIconを使用するケースが多くありました。
しかし、WPF 側でWindows.Formsを使用することを有効化する必要があり、一部の機能で名前空間が競合してしまう場面が多くコードの複雑化とメンテナンス性の低下してしまいます。
H.NotifyIcon はこれらの問題を解決し、WPF のデザイン言語との統合やより良いメンテナンス性を提供します。
環境準備
今回は以下のライブラリを使用して、MVVM パターンでの実装していきます。
- H.NotifyIcon.Wpf
- CommunityToolkit.Mvvm
- Microsoft.Extensions.DependencyInjection
- Microsoft.Xaml.Behaviors.Wpf
- FontAwesome6.Svg
- FontAwesome6.Fonts
これらのパッケージを NuGet からインストールします。
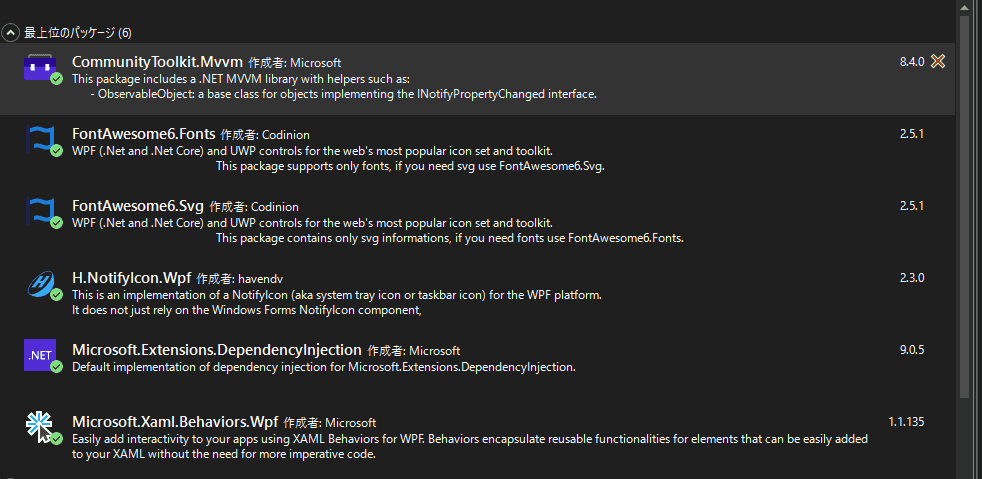
補足ですが、H.NotifyIcon.Wpfパッケージをインストールすると、依存関係としてH.NotifyIconコアライブラリも自動的にインストールされるため、別途インストールする必要はありません。
アイコンを用意する
まずはタスクトレイアイコンで表示するための素材を用意します。今回はICOOON MONOというサイトで以下のようなフォルダの画像を用意しました。
![]()
アイコンのサイズは 16px を選択して、PNG をダウンロードします。
ダウンロードしてきたファイルをマルチアイコン作成 リアルタイム版で.icoファイルに変換します。
今回はAssetsというフォルダを作成して変換したファイルを追加します。

また、ビルド時に実行ファイル(.exe)にアイコンのリソースを含めるために、ビルドアクションをリソースに変更します。
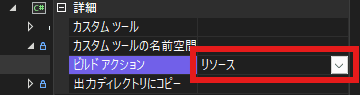
出力ディレクトリにコピーしたアイコンを読み込んでも問題ないですが、��今回は上記の方法が楽だと思います。
基本的な実装
まずは、ViewsとViewModelsフォルダを作成してMainWindow.xamlとMainWindowViewModel.csを作成します。
そしてMainWindow.xamlを以下のように記述します。
<Window x:Class="NotifyIconTutorial.Views.MainWindow"
        xmlns="http://schemas.microsoft.com/winfx/2006/xaml/presentation"
        xmlns:x="http://schemas.microsoft.com/winfx/2006/xaml"
        xmlns:bh="http://schemas.microsoft.com/xaml/behaviors"
        xmlns:d="http://schemas.microsoft.com/expression/blend/2008"
        xmlns:local="clr-namespace:NotifyIconTutorial"
        xmlns:mc="http://schemas.openxmlformats.org/markup-compatibility/2006"
        xmlns:tb="clr-namespace:H.NotifyIcon;assembly=H.NotifyIcon.Wpf"
        Title="MainWindow"
        Width="450"
        Height="450"
        WindowStartupLocation="CenterScreen"
        mc:Ignorable="d">

    <Window.Resources>
        <!--  トレイメニュー(アイコン右クリック時に表示させる)  -->
        <ContextMenu x:Key="TrayMenu">
            <MenuItem Command="{Binding ShowSettingWindowCommand}"
                      Cursor="Hand"
                      Header="表示" />
            <MenuItem Command="{Binding ExitApplicationCommand}"
                      Cursor="Hand"
                      Header="終了" />
        </ContextMenu>
    </Window.Resources>

    <bh:Interaction.Triggers>
        <!--  StateChangedイベントを使用して最小化を検知  -->
        <bh:EventTrigger EventName="StateChanged">
            <bh:InvokeCommandAction Command="{Binding WindowStateChangedCommand}" />
        </bh:EventTrigger>

        <!--  Closingイベントを使用して閉じるボタンを検知  -->
        <bh:EventTrigger EventName="Closing">
            <bh:InvokeCommandAction Command="{Binding WindowClosingCommand}" PassEventArgsToCommand="True" />
        </bh:EventTrigger>
    </bh:Interaction.Triggers>

    <Grid>

        <!--#region NotifyIcon-->
        <tb:TaskbarIcon x:Name="TrayIcon"
                        ContextMenu="{StaticResource TrayMenu}"
                        DoubleClickCommand="{Binding ShowWindowCommand}"
                        IconSource="pack://application:,,,/NotifyIconTutorial;component/Assets/Tasktray-Bule.ico"
                        Visibility="Collapsed" />
                        <!-- ↑起動時はタスクトレイアイコンを表示しない -->
        <!--#endregion-->

        <StackPanel HorizontalAlignment="Center" VerticalAlignment="Center">
            <CheckBox Margin="0,0,0,16"
                    VerticalContentAlignment="Center"
                    Content="閉じるボタンでタスクトレイに格納する"
                    Cursor="Hand"
                    FontSize="16"
                    IsChecked="{Binding IsTaskTray}" />

            <CheckBox VerticalContentAlignment="Center"
                    Content="最小化時にタスクトレイに格納する"
                    Cursor="Hand"
                    FontSize="16"
                    IsChecked="{Binding IsMinimization}" />
        </StackPanel>
    </Grid>
</Window>次にApp.xaml.csに DI の設定を記述します。
using Microsoft.Extensions.DependencyInjection;
using NotifyIconTutorial.ViewModels;
using NotifyIconTutorial.Views;
using System.Windows;

namespace NotifyIconTutorial
{
    /// <summary>
    /// Interaction logic for App.xaml
    /// </summary>
    public partial class App : Application
    {
        protected override void OnStartup(StartupEventArgs e)
        {
            base.OnStartup(e);

            // サービスコレクションを作成
            var services = new ServiceCollection();

            // 起動時の画面と対応したViewModelを登録
            services.AddTransient<MainWindowViewModel>();

            // サービスプロバイダーから登録したViewModelを呼び出しDataContextに代入する
            var provider = services.BuildServiceProvider();
            var mainWindow = new MainWindow
            {
                DataContext = provider.GetRequiredService<MainWindowViewModel>()
            };

            // 画面を起動
            mainWindow.Show();
        }
    }
}現時点でMainWindowViewModel.csはまだフ�ァイルを作成した状態で OK です。
サービスクラスの作成
NotifyIconを制御するためのサービスクラスを作成します。
Servicesというフォルダを作成し、INotifyIconServiceとNotifyIconServiceを作成した以下の用に記述します。
namespace NotifyIconTutorial.Services
{
    /// <summary>
    /// 通知アイコン操作に関するインターフェース
    /// </summary>
    public interface INotifyIconService
    {
        /// <summary>
        /// 通知アイコン初期化
        /// </summary>
        void Initialize();

        /// <summary>
        /// 通知アイコン表示
        /// </summary>
        void ShowNotifyIcon();

        /// <summary>
        /// 通知アイコン非表示
        /// </summary>
        void HideNotifyIcon();
    }
}
インターフェースを実装します。
using H.NotifyIcon;
using System.Windows;

namespace NotifyIconTutorial.Services
{
    public sealed class NotifyIconService : INotifyIconService
    {
        private TaskbarIcon? _notifyIcon;

        public void Initialize()
        {
            // MainWindowからTaskbarIconを取得
            if (Application.Current.MainWindow != null)
            {

                var taskbarIcon = GetNotifyIcon();
                if (taskbarIcon != null)
                {
                    _notifyIcon = taskbarIcon;
                }
            }
        }

        public void HideNotifyIcon()
        {
            _notifyIcon?.SetCurrentValue(TaskbarIcon.VisibilityProperty, Visibility.Collapsed);
        }

        public void ShowNotifyIcon()
        {
            // _notifyIcon が null だったらNotifyIconを取得する
            _notifyIcon ??= GetNotifyIcon();

            // _notifyIcon が null でなけれは表示する
            _notifyIcon?.SetCurrentValue(TaskbarIcon.VisibilityProperty, Visibility.Visible);
        }

        /// <summary>
        /// NotifyIconを取得
        /// </summary>
        /// <returns></returns>
        private TaskbarIcon? GetNotifyIcon()
        {
            // MainWindowからNotifyIconを取得
            var mainWindow = Application.Current.MainWindow as Views.MainWindow;
            return mainWindow?.TrayIcon;
        }
    }
}
ViewModel の実装
MainWindowViewModel.csを以下のように実装します。
using CommunityToolkit.Mvvm.ComponentModel;
using CommunityToolkit.Mvvm.Input;
using NotifyIconTutorial.Services;
using System.ComponentModel;
using System.Windows;

namespace NotifyIconTutorial.ViewModels
{

    public partial class MainWindowViewModel : ObservableObject
    {

        private readonly INotifyIconService _notifyIconService;

        /// <summary>
        /// 閉じるボタンでタスクトレイに格納する
        /// </summary>
        [ObservableProperty]
        private bool _isClosedTaskTray;

        /// <summary>
        /// 最小化時にタスクトレイに格納する
        /// </summary>
        [ObservableProperty]
        private bool _isMinimization;

        [RelayCommand]
        private void WindowClosing(CancelEventArgs e)
        {
            // IsTaskTrayがtrueの場合、タスクトレイに格納して閉じるのをキャンセル
            if (IsClosedTaskTray)
            {
                e.Cancel = true; // 閉じるのをキャンセル

                var window = Application.Current.MainWindow;
                if (window != null)
                {
                    window.Hide(); // ウィンドウを非表示
                    // タスクトレイアイコンを表示
                    _notifyIconService.ShowNotifyIcon();
                }
            }
            // IsTaskTrayがfalseの場合は通常通り閉じる(e.Cancelはfalseのまま)
        }

        [RelayCommand]
        private void ExitApplication()
        {
            // Hide のままだと確認ダイアログが一瞬表示されて非表示になるので Activateメソッドを実行する
            Application.Current.MainWindow.Activate();

            var messege = "アプリケーションを終了しますか?";
            var caption = "確認";

            var result = MessageBox.Show(messege, caption, MessageBoxButton.YesNo, MessageBoxImage.Warning);

            if (result == MessageBoxResult.No) return;

            _notifyIconService.HideNotifyIcon();
            Application.Current.Shutdown();
        }

        [RelayCommand]
        private void ShowWindow()
        {
            // ウィンドウを表示し、前面に持ってくる
            Application.Current.MainWindow.Show();
            Application.Current.MainWindow.WindowState = WindowState.Normal;
            Application.Current.MainWindow.Activate();
            Application.Current.MainWindow.Focus();

            // ウィンドウが表示されたらタスクトレイアイコンを非表示にする
            _notifyIconService.HideNotifyIcon();
        }

        [RelayCommand]
        private void WindowStateChanged()
        {
            var window = Application.Current.MainWindow;
            if (window == null) return;

            if (window.WindowState == WindowState.Minimized)
            {
                // 最小化時にタスクトレイに格納するか否か
                if (!IsMinimization) return;

                // ウィンドウを非表示
                Application.Current.MainWindow.Hide();
                // 通知アイコンを表示
                _notifyIconService.ShowNotifyIcon();
            }
        }

        public MainWindowViewModel(INotifyIconService notifyIconService)
        {
            _notifyIconService = notifyIconService;
            _notifyIconService.Initialize();
        }
    }
}
閉じるボタンを押したときのイベントは、XAML 側の Command にPassEventArgsToCommand="True"を記述することで、イベントを Command のパラメーターに渡すことが出来ます。今回の場合、CancelEventArgsが ViewMdoel 側の Command の引数にわたってきます。
INotifyIconServiceを実装したのでApp.xaml.csに DI の設定を追記します。
using Microsoft.Extensions.DependencyInjection;
+ using NotifyIconTutorial.Services;
using NotifyIconTutorial.ViewModels;
using NotifyIconTutorial.Views;
using System.Windows;

namespace NotifyIconTutorial
{
    /// <summary>
    /// Interaction logic for App.xaml
    /// </summary>
    public partial class App : Application
    {
        protected override void OnStartup(StartupEventArgs e)
        {
            base.OnStartup(e);

            // サービスコレクションを作成
            var services = new ServiceCollection();

            // 起動時の画面と対応したViewModelを登録
            services.AddTransient<MainWindowViewModel>();
+           services.AddTransient<INotifyIconService, NotifyIconService>();

            // サービスプロバイダーから登録したViewModelを呼び出しDataContextに代入する
            var provider = services.BuildServiceProvider();
            var mainWindow = new MainWindow
            {
                DataContext = provider.GetRequiredService<MainWindowViewModel>()
            };

            // 画面を起動
            mainWindow.Show();
        }
    }
}
ビルドしてこれまでの実装を一旦確認します。
想定通り動作していることを確認できました。
バックグラウンド処理実行時
色の違うアイコンを用意して切り替えることで、処理を実行したときに実行中であることが分かるような実装も出来ます。

これらの機能を追加するためにINotifyIconServiceメソッドを追加します。
namespace NotifyIconTutorial.Services
{
    /// <summary>
    /// 通知アイコン操作に関するインターフェース
    /// </summary>
    public interface INotifyIconService
    {
        /// <summary>
        /// 通知アイコン初期化
        /// </summary>
        void Initialize();

        /// <summary>
        /// 通知アイコン表示
        /// </summary>
        void ShowNotifyIcon();

        /// <summary>
        /// 通知アイコン非表示
        /// </summary>
        void HideNotifyIcon();

+       /// <summary>
+       /// アイコンの点滅を開始
+       /// </summary>
+       void StartIconBlinking();

+       /// <summary>
+       /// アイコンの点滅を停止
+       /// </summary>
+       void StopIconBlinking();
    }
}NotifyIconServiceに実際の処理を記述します。
using H.NotifyIcon;
using System.Windows;
using System.Drawing;
using System.Windows.Media.Imaging;
using System.Windows.Threading;

namespace NotifyIconTutorial.Services
{
    public sealed class NotifyIconService : INotifyIconService
    {
        // 省略

        /// <summary>
        /// アイコン切り替え用のタイマー
        /// </summary>
        private DispatcherTimer? _iconBlinkTimer;

        /// <summary>
        /// 切り替え用のアイコンのパス(青色)
        /// </summary>
        private readonly string _normalIconPath = "pack://application:,,,/NotifyIconTutorial;component/Assets/Tasktray-Bule.ico";

        /// <summary>
        /// 切り替え用のアイコンのパス(赤色)
        /// </summary>
        private readonly string _alternateIconPath = "pack://application:,,,/NotifyIconTutorial;component/Assets/Tasktray-Red.ico";

        /// <summary>
        /// アイコンのImageSource(青色)
        /// </summary>
        private BitmapImage? _normalIcon;

        /// <summary>
        /// アイコンのImageSource(赤色)
        /// </summary>
        private BitmapImage? _alternateIcon;

        /// <summary>
        /// 現在のアイコン状態
        /// </summary>
        private bool _isAlternateIcon = false;

        /// <summary>
        /// 初期化処理
        /// </summary>
        public void Initialize()
        {
            // MainWindowからTaskbarIconを取得
            if (Application.Current.MainWindow != null)
            {

                var taskbarIcon = GetNotifyIcon();
                if (taskbarIcon != null)
                {
                    _notifyIcon = taskbarIcon;
                }
            }

            // ↓初期化処理に以下を追加する

            // アイコンの読み込み
            _normalIcon = new BitmapImage(new Uri(_normalIconPath));
            _alternateIcon = new BitmapImage(new Uri(_alternateIconPath));

            // タイマーの初期化
            _iconBlinkTimer = new DispatcherTimer
            {
                Interval = TimeSpan.FromMilliseconds(500) // 500ミリ秒ごとに切り替え
            };
            _iconBlinkTimer.Tick += IconBlinkTimer_Tick;
        }

        private void IconBlinkTimer_Tick(object? sender, EventArgs e)
        {
            if (_notifyIcon == null) return;

            // アイコンを交互に切り替え
            _isAlternateIcon = !_isAlternateIcon;
            _notifyIcon.IconSource = _isAlternateIcon ? _alternateIcon : _normalIcon;
        }

        public void StartIconBlinking()
        {
            _iconBlinkTimer?.Start();
        }

        public void StopIconBlinking()
        {
            _iconBlinkTimer?.Stop();

            // 通常アイコンに戻す
            if (_notifyIcon != null && _normalIcon != null)
            {
                _notifyIcon.IconSource = _normalIcon;
                _isAlternateIcon = false;
            }
        }

        // 省略

    }

}
最後に XAML 側でコンテキストメニューとコマンドを追加して、ViewMdoel で以下のコマンドを追記します。
/// <summary>
/// バックグラウンド処理実行中かどうか
/// </summary>
[ObservableProperty]
private bool _isBackgroundTaskRunning;

// 省略

[RelayCommand]
private async Task ExecuteBackgroundTask()
{
    // すでに実行中なら何もしない
    if (IsBackgroundTaskRunning)
        return;

    try
    {
        // バックグラウンド処理開始
        IsBackgroundTaskRunning = true;

        // 点滅開始
        _notifyIconService.StartIconBlinking();

        // バックグラウンド処理を模擬
        await Task.Delay(10000); // 10秒間のダミー処理

        // 処理完了時の通知
        MessageBox.Show("バックグラウンド処理が完了しました", "完了", MessageBoxButton.OK, MessageBoxImage.Information);
    }
    catch (Exception ex)
    {
        MessageBox.Show($"エラーが発生しました: {ex.Message}", "エラー", MessageBoxButton.OK, MessageBoxImage.Error);
    }
    finally
    {
        // バックグラウンド処理終了
        IsBackgroundTaskRunning = false;

        // アイコン点滅を停止
        _notifyIconService.StopIconBlinking();
    }
}
バルーン通知の実装
実装の詳細は割愛しますが、最後にバルーン通知を実装した場合の動きを紹介します。
実際のコードは GitHub のリポジトリを参照して下さい。
おわりに
H.NotifyIcon.Wpf を使用したタスクトレイアイコンの実装は、従来の WindowsForms の NotifyIcon を使用する方法と比較して、WPF アプリケーションとの統合性が高く、より柔軟なカスタマイズが可能です。また、MVVM パターンを採用することでコードの保守性も向上します。
サンプルコードは簡単な例ですが、実際のアプリケーションでは、より複雑な状態管理やユーザーインタラクションが必要になるかもしれません。今回作成したアプリケーションのコードはGitHub で公開しています。
おすすめの書籍
![独習C# 第5版 [ 山田 祥寛 ]](https://thumbnail.image.rakuten.co.jp/@0_mall/book/cabinet/5560/9784798175560_1_133.jpg)
独習C# 第5版 [ 山田 祥寛 ]
![[改訂新版]実戦で役立つ C#プログラミングのイディオム/定石&パターン [ 出井 秀行 ]](https://thumbnail.image.rakuten.co.jp/@0_mall/book/cabinet/3077/9784297143077_1_3.jpg)
[改訂新版]実戦で役立つ C#プログラミングのイディオム/定石&パターン [ 出井 秀行 ]
以下の書籍は初心者向けではないですが、コードの書き方で迷いがあるときに読んでみると良いかもしれません。言語は C# ですが、他の言語でも役立つ考え方や学びがあると思います。
![.NETのクラスライブラリ設計 改訂新版 開発チーム直伝の設計原則、コーディング標準、パターン【電子書籍】[ Krzysztof Cwalina ]](https://thumbnail.image.rakuten.co.jp/@0_mall/rakutenkobo-ebooks/cabinet/7316/2000010367316.jpg)