


はじめに
DataGrid でカラムにチェックボックスを�追加した際に、そのチェックボックスの全ての状態を一括で切り替えたいと思ったことはありませんか?
今回の記事では、DataGrid のヘッダーにチェックボックスを実装して、そのチェックボックスで全ての状態を切り替える実装をします。
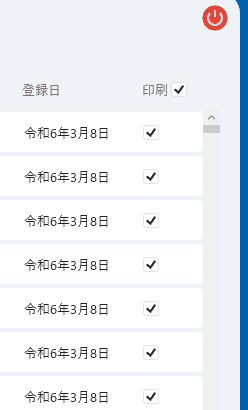
作成した機能のイメージです。
以下の記事で使用したリポジトリを流用しています。
このプロジェクトでは CommunityToolkit.Mvvm を使用しているので、ライブラリの使い方をざっくり知っておきたい方は以下の記事を参照して下さい。


DataGridCheckBoxColumn を追加
DataGrid のヘッダーにもチェックボックスを追加するにはDataGridCheckBoxColumnを使用します。
<!-- 省略 -->

<DataGrid Grid.Row="1"
          CellStyle="{DynamicResource DataGridCellStyle}"
          ColumnHeaderStyle="{DynamicResource DataGridColumnHeaderStyle}"
          ItemsSource="{Binding FilteredCustomerList}"
          RowStyle="{DynamicResource DataGridRowStyle}"
          ScrollViewer.HorizontalScrollBarVisibility="Auto"
          Style="{DynamicResource DataGridStyle}">

     <DataGrid.Columns>

        <!-- 省略 -->

        <!--#region 印刷-->
        <DataGridCheckBoxColumn Width="Auto"
                                CanUserResize="False"
                                ElementStyle="{StaticResource CheckBoxStyle1}">
            <DataGridCheckBoxColumn.HeaderTemplate>
                <DataTemplate>
                    <StackPanel HorizontalAlignment="Center"
                                VerticalAlignment="Center"
                                Orientation="Horizontal">
                        <TextBlock Text="印刷" />
                        <CheckBox Margin="2,0,0,0"
                                  Cursor="Hand"
                                  IsChecked="{Binding DataContext.IsAllPrintChecked, RelativeSource={RelativeSource AncestorType=DataGrid}}"
                                  Style="{StaticResource CheckBoxStyle1}" />
                    </StackPanel>
                </DataTemplate>
            </DataGridCheckBoxColumn.HeaderTemplate>
            <DataGridCheckBoxColumn.Binding>
                <Binding Path="IsPrint" />
            </DataGridCheckBoxColumn.Binding>

        </DataGridCheckBoxColumn>
        <!--#endregion-->

     </DataGrid.Columns>
</DataGrid>DataGridCheckBoxColumn.HeaderTemplateにはカラムのヘッダー部分の見た目をカスタマイズするためのテンプレートを定義できます。
DataTemplateを使用して、今回ではStackPanelを使用してTextBlockとCheckBox要素を横並びに表示するようにカスタマイズしています。
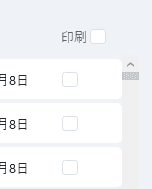
以下のような見た目になります。
ヘッダーのチェックボックスのプロパティは、MainWindowViewModel.cs内に記述します。
using CommunityToolkit.Mvvm.ComponentModel;
using CommunityToolkit.Mvvm.Input;
using MVVM.MultiWindowSample.Entitirs;
using MVVM.MultiWindowSample.Repositories;
using MVVM.MultiWindowSample.Servicies;
using MVVM.MultiWindowSample.ViewModels;
using MVVM.MultiWindowSample.Views;
using System.Collections.ObjectModel;
using System.Windows;

namespace MVVM.MultiWindowSample
{
    public partial class MainWindowViewModel : ObservableObject
    {
        private readonly IUsersRepository<UserEntity> _usersRepository;

        private readonly IWindowService _windowService;

        private ObservableCollection<UserEntity> _allCustomerList;

        #region プロパティ

+       [ObservableProperty]
+       private bool _isAllPrintChecked = true; // デフォルト値を指定

        [ObservableProperty]
        private ObservableCollection<UserEntity> _filteredCustomerList;

        // 省略

    }
}
ここでは以下の点がポイントとなります。
RelativeSource={RelativeSource AncestorType=DataGrid}で、バインディングしたいプロパティをDataGrid要素までさかのぼる- 明示的に
Binding DataContext.IsAllPrintCheckedと指定することで、全体の ViewModel(DataGrid 自体が持つ DataContext)内のプロパティを参照できる Binding IsAllPrintCheckedと記述するだけだと、プロパティが参照できないとエラーになる
RelativeSourceを使用したバインディングの指定は DataGrid や DataTemplate でカスタマイズした要素などではけっこう頻繁に使用するので、慣れておくと良いかもしれません。
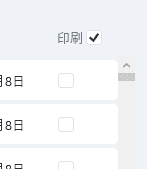
ここまでの実装で以下のような見た目になります。
次にDataGridCheckBoxColumn.Bindingではこの DataGrid にバインディングされているコレクションやリストに格納されているクラスのプロパティを指定します。
UserEntityを格納しているのでそのクラス内にIsPrintプロパティが存在し、プロパティ変更通知の実装がされていることを確認します。
今回はUserEntityにIsPrintプロパティがまだ実装されていないので追加します。
DataGrid のセルの値の変化に対応する
UserEntityを以下の用に修正します。
using CommunityToolkit.Mvvm.ComponentModel;
using MVVM.MultiWindowSample.ValueObjects;

namespace MVVM.MultiWindowSample.Entitirs
{
+   public partial class UserEntity : ObservableObject // ObservableObjectを継承し、partial修飾子を追加
    {
        public long Id { get; }
        public string Name { get; }

+       [ObservableProperty]
+       public bool _isPrint = true;

        public UserEntity(
            long id,
            // 省略
            string updated_at)

        {
            Id = id;

            // 省略

            UpdatedAt = updated_at;
        }
    }
}
DataGrid に表示されている全てのコレクションを更新するだけならItemsSource="{Binding FilteredCustomerList}"にバインディングされているFilteredCustomerListに新しいデータを流し込むだけで問題ありません。
しかし、各行やセルに表示されているデータやチェックボックスの状態をセル単位で変更可能にするには、DataGrid にバインディングしているクラスのプロパティ自体に、プロパティ変更通知の仕組みを実装する必要があります。
つまりUserEntityのプロパティに、プロパティ変更通知の仕組み(INotifyPropertyChanged)を実装する必要があるということです。
今回はその仕組をObservablePropertyで実装しています。
そうすることで、各チェックボックスの状態も変更可能になります。
一括変更の処理を実装する
最後にチェックボックスの一括変更の処理を実装していきます。
using CommunityToolkit.Mvvm.ComponentModel;
using CommunityToolkit.Mvvm.Input;
using MVVM.MultiWindowSample.Entitirs;
using MVVM.MultiWindowSample.Repositories;
using MVVM.MultiWindowSample.Servicies;
using MVVM.MultiWindowSample.ViewModels;
using MVVM.MultiWindowSample.Views;
using System.Collections.ObjectModel;
using System.Windows;

namespace MVVM.MultiWindowSample
{
    public partial class MainWindowViewModel : ObservableObject
    {
        private readonly IUsersRepository<UserEntity> _usersRepository;

        private readonly IWindowService _windowService;

        private ObservableCollection<UserEntity> _allCustomerList;

        #region プロパティ

        [ObservableProperty]
        private bool _isAllPrintChecked = true; // デフォルト値を指定

+       partial void OnIsAllPrintCheckedChanged(bool value)
+       {
+           FilteredCustomerList.ToList().ForEach(user => user.IsPrint = value);
+       }

        [ObservableProperty]
        private ObservableCollection<UserEntity> _filteredCustomerList;

        // 省略

    }
}
プロパティ変更時に実行する処理を記述しています。
処理はとてもシンプルで、プロパティ変更後の値を受け取ってコレクション内の全てのUserEntityのプロパティを更新しています。
参考までに、今までの ViewModel 側の実装を Prism フレームワークなどを使用して記述する場合は以下のような実装�になります。
// その他のプロパティの実装は省略

public bool IsAllPrintChecked
{
    get => _isAllPrintChecked;
    set
    {
        // プロパティの値が変更されなかったら処理を終了
        if(!SetProperty(ref _isAllPrintChecked, value)) return;

        // 全てのチェックボックスの状態を変更
        FilteredCustomerList.ToList().ForEach(user => user.IsPrint = value);
    };
}
private bool _isAllPrintChecked = true;

public ObservableCollection<UserEntity> FilteredCustomerList
{
    get => _filteredCustomerList;
    set => SetProperty(ref _filteredCustomerList, value);
}
private ObservableCollection<UserEntity> _filteredCustomerList;
ここまでの実装で目的の動作になりました。
まとめ
DataGrid でRelativeSourceを使用してバインディングするプロパティやCommandParameterを指定できる様になると、やりたい実装の幅が広がると思います。
他にも DataGrid を使用した Tips はいくつかあるので紹介していきたいと思います。(今回のプロジェクトを使い回すと思いますが…😅)