はじめに
今回の記事では CommunityToolkit.Mvvm を使用した MVVM パターンでの実装方法を見ていきます。
WPF でアプリケーションを作成するときは Prism を使用していますが、小規模なツールだと CommunityToolkit.Mvvm やその他の細かいライブラリを組み合わせたほうが開発効率が良いと感じました。
このライブラリはソースジェネレーターとして動作し、最小限の記述で今まで手動で記述していた MVVM に関する実装をバックグラウンドで自動に生成してくれます。
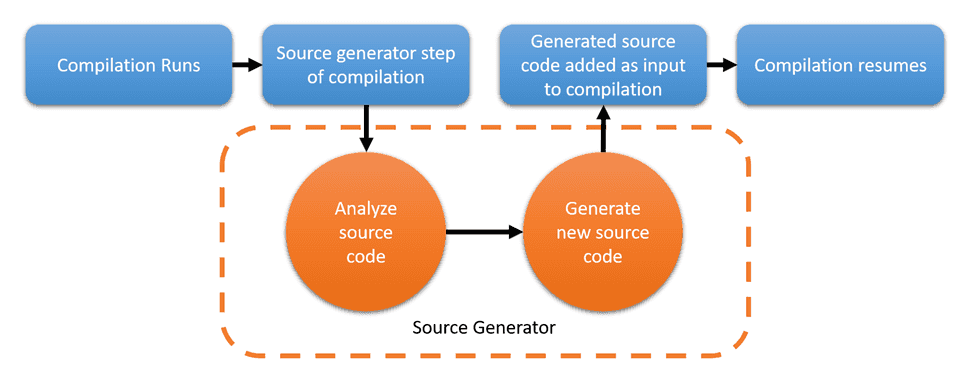 MVVM ソース ジェネレーターより引用
具体的な実際にアプリケーションを作成しながら解説していきます。
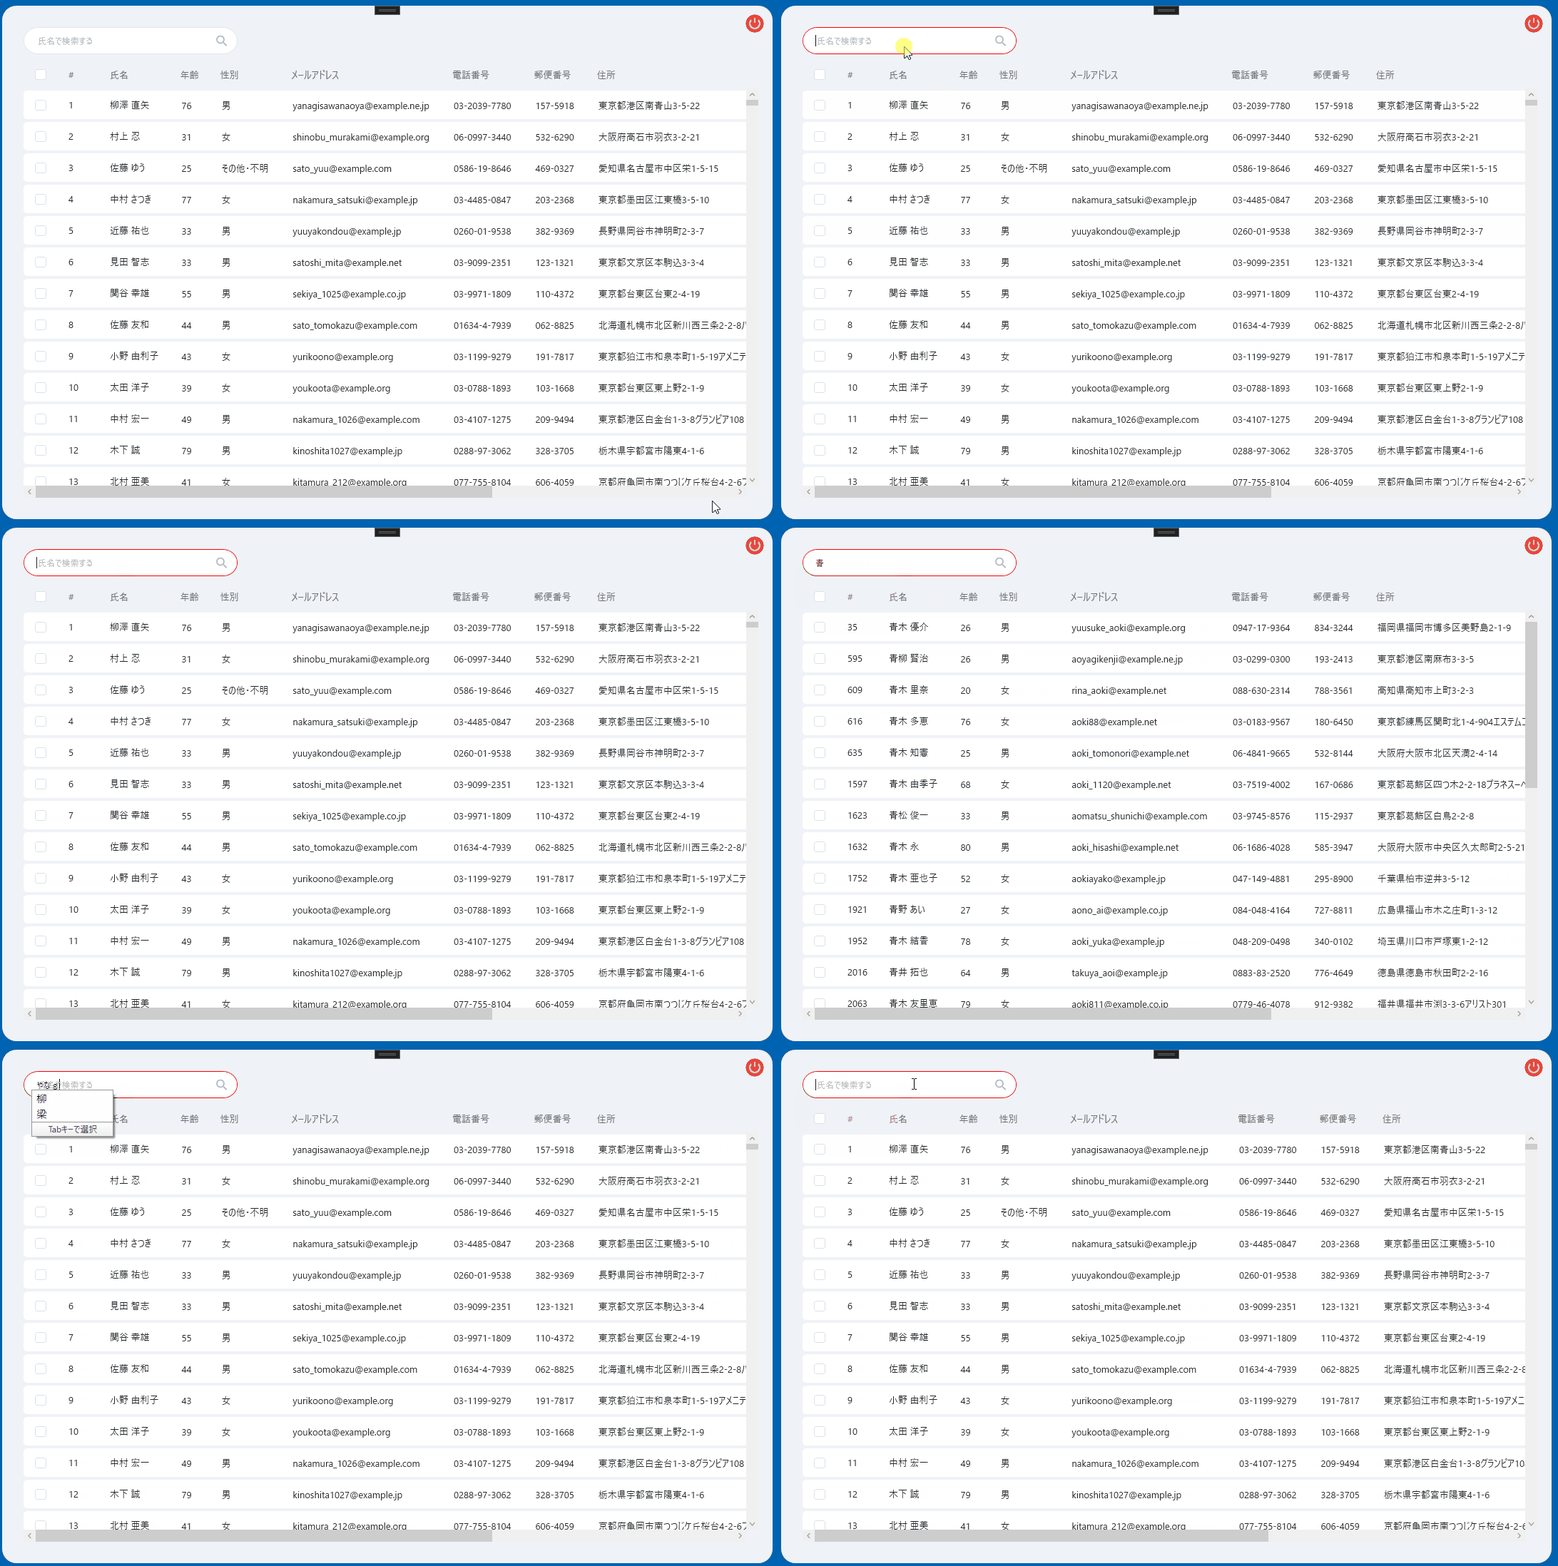
作成したアプリケーションのイメージです(過去に Prism で作成したものを流用しています。)
開発環境
- Windows 11 Pro 23H2
- Visual Studio 2022(17.12.3)
使用ライブラリ
CommunityToolkit.Mvvm とは関係ありませんが、その他のライブラリをいくつかインストールしています。
- CommunityToolkit.Mvvm(8.4.0)
- Microsoft.Extensions.DependencyInjection(9.0.0)
- Microsoft.Xaml.Behaviors.Wpf(1.1.135)
- MahApps.Metro.IconPacks.Material(5.1.0)
- Dapper(2.1.35)
- Microsoft.Data.SqlClient(5.2.2)
- Microsoft.Data.Sqlite(9.0.0)
CommunityToolkit.Mvvm のインストール
Nuget パッケージ管理ツールより必要なライブラリをインストールします。

ViewModel の作成
以下のフォルダの作成は必須ではないですが、分けておくほうがファイルの見通しが良いので推奨します。
ViewsとViewModelsというフォルダを作成し、MainWindow.xamlをViewsフォルダに移動します。
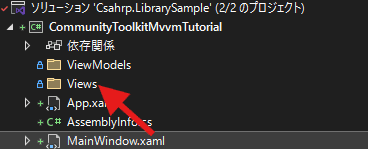
本来であればMainWindow.xamlを移動したので起動時に表示させる画面のファイルパスを変更するためにApp.xamlのStartupUriを修正しますが、今回は Microsoft.Extensions.DependencyInjection を使用している都合上、この記述は削除します。

その他のライブラリに関しても同様にインストールしてください。
次にMainWindowViewModel.csファイルを以下のように修正します。
using CommunityToolkit.Mvvm.ComponentModel;

namespace CommunityToolkitMvvmTutorial
{
    // partial 修飾子をつける
    public partial class MainWindowViewModel : ObservableObject
    {
        // ObservableProperty属性を記述する
        [ObservableProperty]
        private string _searchText;
    }
}ObservableObjectクラスはINotifyPropertyChangedなどプロパティ変更通知の仕組みが実装された基底クラスです。
private なメンバ変数に[ObservableProperty]属性を付与することで、例えば Prism で書いていた以下のような getter と setter プロパティが自動で生成されます。
public string SearchText
{
    get => _searchText;
    set => SetProperty(ref _searchText, value);
}
private string _searchText;この時点でMainWindowViewModelクラスにマウスカーソルを合わせてCtrl + マウス右クリックかF12キーを押すことで生成されたコードを確認することが出来ます。
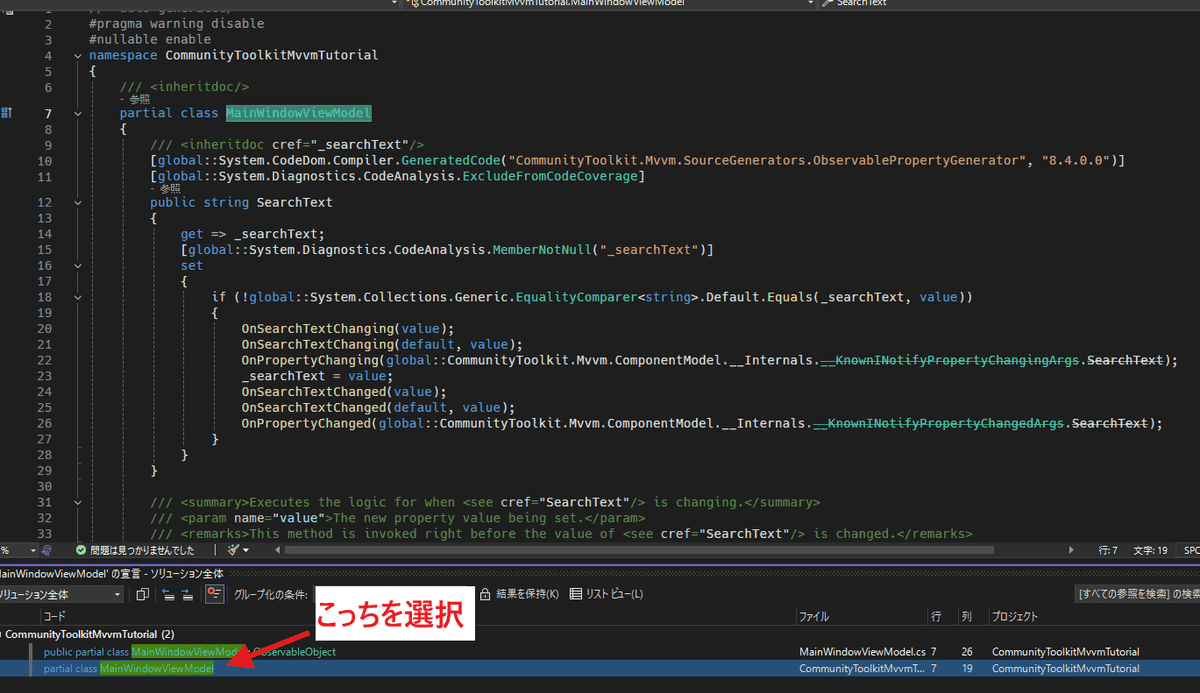
setter プロパティ内にいくつかメソッドが実装されているのが確認できます。
後ほど解説しますが、プロパティ変更時に任意の処理を差し込みたい場合にこれらのメソッドを使用します。
DependencyInjection の実装
このアプリケーションでは SQLite のデータを WPF の DataGrid コントロールに表示させています。
データの取得にはIUsersRepository<T>を使用しており、ViewModel のコンストラクタで初期化処理が実行されたときにこの Repository を読み込みたいのでApp.xaml.csファイルを以下のように修正します。
using CommunityToolkitMvvmTutorial.Entitirs;
using CommunityToolkitMvvmTutorial.Models;
using CommunityToolkitMvvmTutorial.Repositories;
using CommunityToolkitMvvmTutorial.Views;
using Microsoft.Extensions.DependencyInjection;
using System.Windows;

namespace CommunityToolkitMvvmTutorial
{
    /// <summary>
    /// Interaction logic for App.xaml
    /// </summary>
    public partial class App : Application
    {
        protected override void OnStartup(StartupEventArgs e)
        {
            base.OnStartup(e);

            // サービスコレクションを作成
            var services = new ServiceCollection();

            // Repositoryインターフェースと実装クラスを登録
            // ViewModelのコンストラクタの引数に IUsersRepository<UserEntity> を指定することでDIすることが可能になる
            services.AddTransient<IUsersRepository<UserEntity>, Users>();

            // 起動時の画面と対応したViewModelを登録
            services.AddTransient<MainWindowViewModel>();

            // サービスプロバイダーから登録したViewModelを呼び出しDataContextに代入する
            var provider = services.BuildServiceProvider();
            var mainWindow = new MainWindow
            {
                DataContext = provider.GetRequiredService<MainWindowViewModel>()
            };

            // 画面を起動
            mainWindow.Show();
        }
    }
}
次に ViewModel を以下のように修正します。
using CommunityToolkit.Mvvm.ComponentModel;
+ using CommunityToolkitMvvmTutorial.Repositories;

namespace CommunityToolkitMvvmTutorial
{
    public partial class MainWindowViewModel : ObservableObject
    {
+       private readonly IUsersRepository<UserEntity> _usersRepository;

        [ObservableProperty]
        private string _searchText;

+       public MainWindowViewModel(IUsersRepository<UserEntity> usersRepository)
+       {
+           _usersRepository = usersRepository;
+       }

    }
}
RelayCommand の実装
XAML の Command にバインディングさせたいメソッドに[RelayCommand]属性を付与することで、ICommandを実装したIRelayCommandが自動で生成されます。
using CommunityToolkit.Mvvm.ComponentModel;
using CommunityToolkitMvvmTutorial.Repositories;
+ using CommunityToolkit.Mvvm.Input;

namespace CommunityToolkitMvvmTutorial
{
    public partial class MainWindowViewModel : ObservableObject
    {
        private readonly IUsersRepository<UserEntity> _usersRepository;

        [ObservableProperty]
        private string _searchText;

        public MainWindowViewModel(IUsersRepository<UserEntity> usersRepository)
        {
            _usersRepository = usersRepository;
        }

        /// <summary>
        /// アプリケーションを終了する
        /// </summary>
+       [RelayCommand]
+       private void Shutdown()
+       {
+           Application.Current.Shutdown();
+       }

    }
}Shutdownメソッドを実装後、再びMainWindowViewModelクラスにマウスカーソルを合わせてCtrl + マウス右クリックかF12キーを押すこと�で生成されたコードを確認できます。
コードが生成されていなかった場合はツールバーの[ビルド]よりリビルドを実行してみてください。
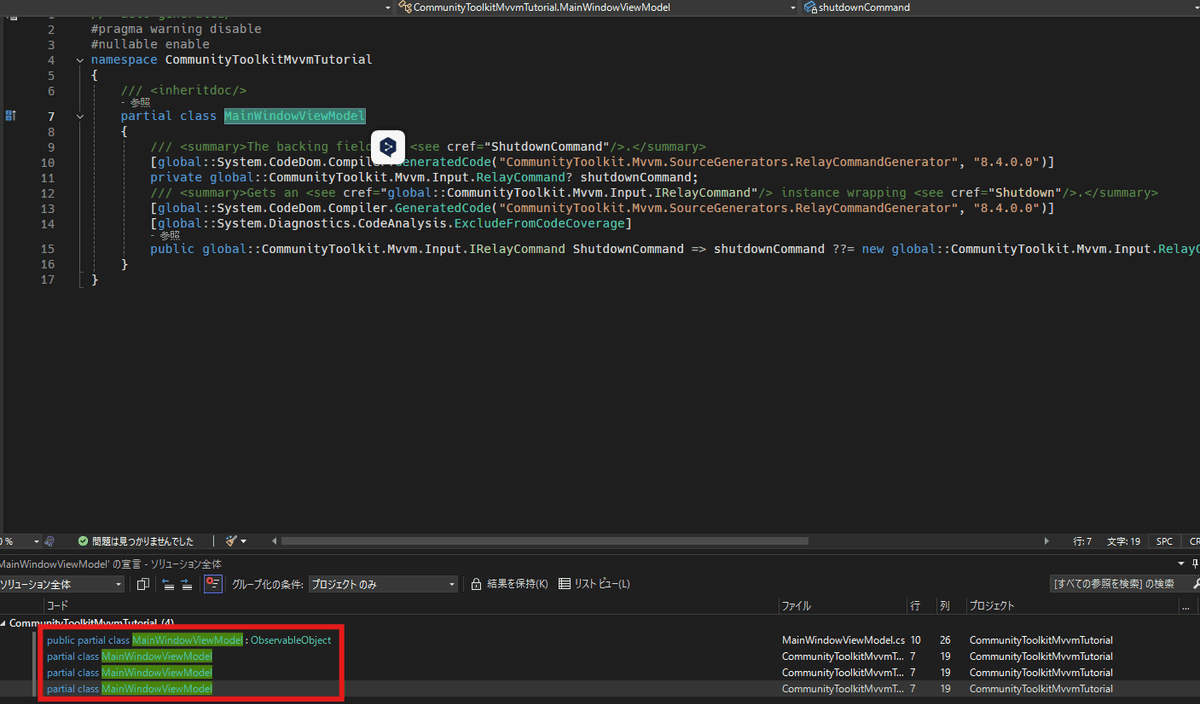
ShutdownCommand => shutdownCommand ?? =new global....からわかるように、ShutdownCommandというプロパティが生成されています。XMLA 側で Button などの要素で使用する場合はこのプロパティを Command 属性にバインディングします。
更に起動時に SQLite のデータベースからデータを非同期で読み込むために以下の記述を追加します。
using CommunityToolkit.Mvvm.ComponentModel;
using CommunityToolkit.Mvvm.Input;
using CommunityToolkitMvvmTutorial.Entitirs;
using CommunityToolkitMvvmTutorial.Repositories;
using System.Collections.ObjectModel;
using System.Windows;

namespace CommunityToolkitMvvmTutorial
{
    public partial class MainWindowViewModel : ObservableObject
    {
        private readonly IUsersRepository<UserEntity> _usersRepository;

        [ObservableProperty]
        private string _searchText;

+       [ObservableProperty]
+       private ObservableCollection<UserEntity> _allCustomerList;

        public MainWindowViewModel(IUsersRepository<UserEntity> usersRepository)
        {
            _usersRepository = usersRepository;
        }

        /// <summary>
        /// アプリケーションを終了する
        /// </summary>
        [RelayCommand]
        private void Shutdown()
        {
            Application.Current.Shutdown();
        }

        /// <summary>
        /// 初期化処理
        /// </summary>
        /// <returns></returns>
+       [RelayCommand]
+       private async Task InitializeAsync()
+       {
+           try
+           {
+               var enumerableData = await _usersRepository.GetUsersAsync();
+               AllCustomerList = new ObservableCollection<UserEntity>(enumerableData);
+           }
+           catch (Exception ex)
+           {
+               MessageBox.Show($"初期化中にエラーが発生しました。\n[{ex.Message}]");
+           }
+       }

    }
}[RelayCommand]属性を付与したメソッドを非同期処理にするには、通常の非同期メソッドを作成するときと同様にasync Taskを加えます。
この記述でソースジェネレーター側でIAsyncRelayCommandを型としているプロパティが生成されますが、注意点としてメソッド名を~Asyncとしている場合、サフィックスとして指定した Async は削除された名前でプロパティが生成されます。
つまりInitializeAsyncメソッドを指定した場合、生成されるプロパティはInitializeCommandということになります。

またメソッド名にプレフィックスとしてOn~というメソッド名にした場合もこのOnは削除さ��れたプロパティ名が生成されます。
生成されたコマンドの名前は、メソッド名に基づいて作成されます。 ジェネレーターはメソッド名を使用し、末尾に “Command” を追加し、“On” プレフィックス (存在する場合) を削除します。 さらに、非同期メソッドの場合は、“Command” が追加される前に “Async” サフィックスも削除されます。
RelayCommand 属性より引用
作成した非同期メソッドはコンストラクタ内で実行出来ないため、Microsoft.Xaml.Behaviors.Wpfを使用して画面の初期化が終わった時点のLoadedイベントに Command をバインディングします。
以下の記事でコンストラクタ内で非同期処理を実行できない(正確にはすべきではない)理由や XAML 側の実装も解説しているので、詳細はこちらの記事を参照するかソースコードを確認してください。
一旦アプリケーションを起動して、ここまでの実装の動作確認をしておきます。
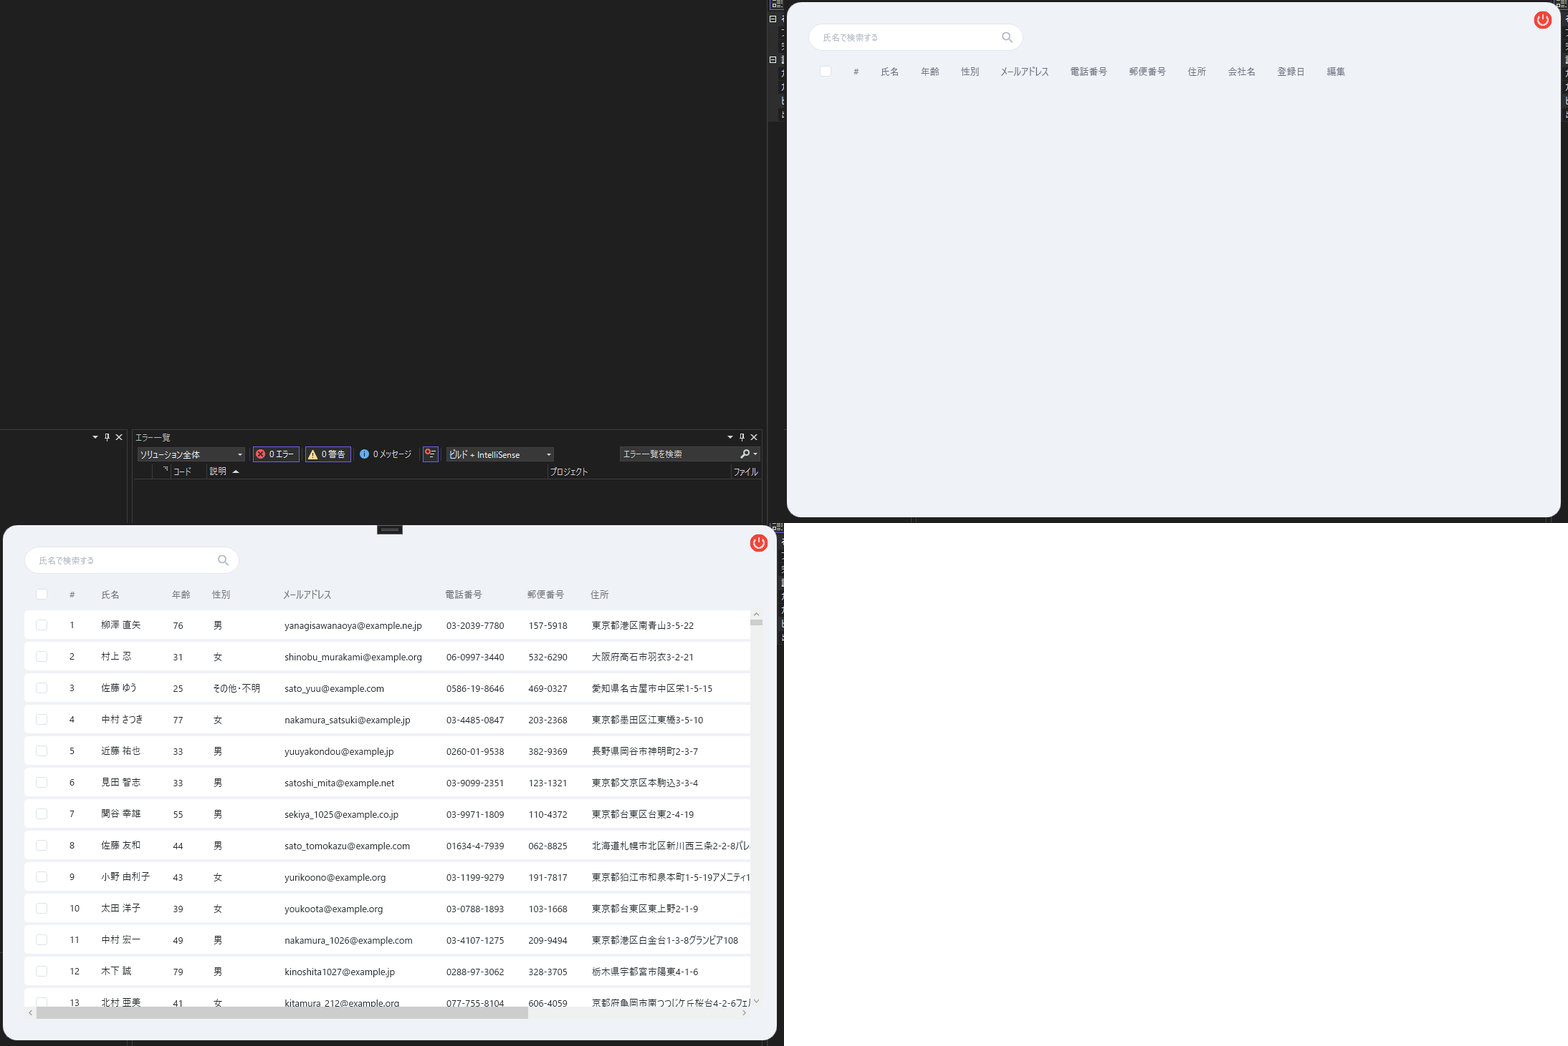
プロパティの変更時に任意の処理を差し込む
次に画面上部に設置した TextBox で名前で絞り込み検索する処理を実装していきます。
[ObservableProperty]属性を指定したプロパティ実装方法のときにも触れましたが、生成されたコードの setter 内の処理にOn[プロパティ名]Changing(value)やOn[プロパティ名]Changed(value)メソッドが実装されて��いました。
これらのメソッドの見てみると以下のようにpartial修飾子が付与されていることがわかります。
// 省略

[global::System.CodeDom.Compiler.GeneratedCode("CommunityToolkit.Mvvm.SourceGenerators.ObservablePropertyGenerator", "8.4.0.0")]
partial void OnSearchTextChanging(string value);

 [global::System.CodeDom.Compiler.GeneratedCode("CommunityToolkit.Mvvm.SourceGenerators.ObservablePropertyGenerator", "8.4.0.0")]
partial void OnSearchTextChanging(string? oldValue, string newValue);partial修飾子は、同じクラスを複数のファイルに分割して宣言する事ができる機能です。
詳細な解説は15.2.7 部分宣言や型の分割定義 (partial)などを参照してもらうほうが良いと思いますが、partial void OnSearchTextChangingというメソッドを ViewModel 側で宣言することでビルド時にソースジェネレータで生成されているコードに処理内容をマージすることが出来ます。
それによってプロパティ値が変更されたときの処理を差し込むことが出来ます。
生成されているメソッドの用途は以下のとおりです。
| メソッド名 | 実行タイミング | 用途 |
|---|---|---|
OnSearchTextChanging(string value) | プロパティ変更直前 | valueには変更後の新しい値が入っている |
OnSearchTextChanging(string? oldValue, string newValue) | プロパティ変更直前 | 古い値と新しい値の両方を使用して処理を行う |
OnSearchTextChanged(string value) | プロパティ変更直後 | valueには変更後の新しい値が入っている |
OnSearchTextChanged(string? oldValue, string newValue) | プロパティ変更直後 | 古い値と新しい値の両方を使用して処理を行う |
試しに、TextBox の PlaceHolder の表示・非表示を切り替える実装をしてみます。
using CommunityToolkit.Mvvm.ComponentModel;
using CommunityToolkit.Mvvm.Input;
using CommunityToolkitMvvmTutorial.Entitirs;
using CommunityToolkitMvvmTutorial.Repositories;
using System.Collections.ObjectModel;
using System.Windows;

namespace CommunityToolkitMvvmTutorial
{
    public partial class MainWindowViewModel : ObservableObject
    {
        private readonly IUsersRepository<UserEntity> _usersRepository;

        [ObservableProperty]
        private string _searchText;

        [ObservableProperty]
        private ObservableCollection<UserEntity> _allCustomerList;

+       [ObservableProperty]
+       private bool _hasUserInput = true;

+       partial void OnSearchTextChanging(string value)
+       {
+           HasUserInput = string.IsNullOrWhiteSpace(value) ? true : false;
+       }

        public MainWindowViewModel(IUsersRepository<UserEntity> usersRepository)
        {
            _usersRepository = usersRepository;
        }

        /// <summary>
        /// アプリケーションを終了する
        /// </summary>
        [RelayCommand]
        private void Shutdown()
        {
            Application.Current.Shutdown();
        }

        /// <summary>
        /// 初期化処理
        /// </summary>
        /// <returns></returns>
        [RelayCommand]
        private async Task InitializeAsync()
        {
            try
            {
                var enumerableData = await _usersRepository.GetUsersAsync();
                AllCustomerList = new ObservableCollection<UserEntity>(enumerableData);
            }
            catch (Exception ex)
            {
                MessageBox.Show($"初期化中にエラーが発生しました。\n[{ex.Message}]");
            }
        }

    }
}
シンプルにテキストの入力があれば bool 値を切り替えている処理です。
XAML 側の実装は以下のとおりです。
<Window x:Class="CommunityToolkitMvvmTutorial.Views.MainWindow"
        xmlns="http://schemas.microsoft.com/winfx/2006/xaml/presentation"
        xmlns:x="http://schemas.microsoft.com/winfx/2006/xaml"
        xmlns:Icon="http://metro.mahapps.com/winfx/xaml/iconpacks"
        xmlns:bh="http://schemas.microsoft.com/xaml/behaviors"
        Width="1080"
        Height="720"
        AllowsTransparency="True"
        Background="Transparent"
        WindowStartupLocation="CenterScreen"
        WindowStyle="None">
    <bh:Interaction.Triggers>
        <bh:EventTrigger EventName="Loaded">
            <bh:InvokeCommandAction Command="{Binding InitializeCommand}" />
        </bh:EventTrigger>
    </bh:Interaction.Triggers>

    <Window.Resources>
        <BooleanToVisibilityConverter x:Key="BoolToVis" />
    </Window.Resources>

    <Border Background="#eff2f7"
            CornerRadius="20"
            MouseDown="Border_MouseDown"
            MouseLeftButtonDown="Border_MouseLeftButtonDown">

        <Grid>

            <!-- 省略 -->

            <Grid Margin="30,20,20,30">

                <Grid.RowDefinitions>
                    <RowDefinition Height="Auto" />
                    <RowDefinition Height="*" />
                    <RowDefinition Height="Auto" />
                </Grid.RowDefinitions>

                <!--#region Search TextBox-->
                <Grid Grid.Row="0"
                      Width="300"
                      HorizontalAlignment="Left">

                    <!-- TextBox未入力時にplaceholderとして表示している文字列 -->
                    <TextBlock Margin="20,0"
                               VerticalAlignment="Center"
                               Panel.ZIndex="1"
                               Foreground="#b0b9c6"
                               IsHitTestVisible="False"
                               Text="氏名で検索する"
                               Visibility="{Binding HasUserInput, Converter={StaticResource BoolToVis}}" />

                    <!-- 検索ボックス -->
                    <TextBox x:Name="txtSearch"
                             Style="{StaticResource textBoxSearch}"
                             Text="{Binding SearchText, UpdateSourceTrigger=PropertyChanged}" />


                    <!-- 省略 -->


                </Grid>
                <!--#endregion-->

                <!-- 省略 -->


        </Grid>

    </Border>
</Window>
正常に動作していることがわかります。

次に名前で DataGrid 内のデータを絞り込む機能を実装してみます。
using CommunityToolkit.Mvvm.ComponentModel;
using CommunityToolkit.Mvvm.Input;
using CommunityToolkitMvvmTutorial.Entitirs;
using CommunityToolkitMvvmTutorial.Repositories;
using System.Collections.ObjectModel;
using System.Windows;

namespace CommunityToolkitMvvmTutorial
{
    public partial class MainWindowViewModel : ObservableObject
    {
        private readonly IUsersRepository<UserEntity> _usersRepository;

+       private ObservableCollection<UserEntity> _allCustomerList;

        #region プロパティ

        [ObservableProperty]
        private string _searchText;

-       [ObservableProperty]
-       private ObservableCollection<UserEntity> _allCustomerList;
+       [ObservableProperty]
+       private ObservableCollection<UserEntity> _filteredCustomerList;

        [ObservableProperty]
        private bool _hasUserInput = true;

        partial void OnSearchTextChanging(string value)
        {
            HasUserInput = string.IsNullOrWhiteSpace(value) ? true : false;

+           {
+               FilteredCustomerList = new ObservableCollection<UserEntity>(_allCustomerList);
+           }
+           else
+           {
+               var filteredData = _allCustomerList.Where(x => x.Name?.Contains(value,
+                                                                               StringComparison.OrdinalIgnoreCase) // 大文字小文字を区別しないオプション
+                                                                               == true);
+               FilteredCustomerList = new ObservableCollection<UserEntity>(filteredData);
+           }
        }

        #endregion

        public MainWindowViewModel(IUsersRepository<UserEntity> usersRepository)
        {
            _usersRepository = usersRepository;
        }

        #region コマンド

        /// <summary>
        /// アプリケーションを終了する
        /// </summary>
        [RelayCommand]
        private void Shutdown()
        {
            Application.Current.Shutdown();
        }

        /// <summary>
        /// 初期化処理
        /// </summary>
        /// <returns></returns>
        [RelayCommand]
        private async Task InitializeAsync()
        {
            try
            {
                var enumerableData = await _usersRepository.GetUsersAsync();

+               // 全ユーザーデータを保持する
+               _allCustomerList = new ObservableCollection<UserEntity>(enumerableData);
+               // DataGridにバインディングするフィルター済みのデータ
+               FilteredCustomerList = new ObservableCollection<UserEntity>(_allCustomerList);
            }
            catch (Exception ex)
            {
                MessageBox.Show($"初期化中にエラーが発生しました。\n[{ex.Message}]");
            }
        }

        #endregion

    }
}
DataGrid にバインディングさせるプロパティをFilteredCustomerListに変更します。
その後、ビルドして TextBox の入力値で絞り込み検索ができるか確認してください。
最後に
今回は CommunityToolkit.Mvvm の基本的な使い方についてサンプルアプリケーションを作成しながら見てきました。
まだ他にMessangerを使用した ViewModel 間でデータをやり取りする機能など、便利な機能があるのでどのような場面で使用すればよいのか、実際にアプリケーションを作成しながら試していきたいと思います。
今回作成したサンプルコードはこちらから見れます。
