はじめに
今回の記事ではデフォルトの TextBox ��の見た目を、ライブラリを頼らずアレンジしていきます。

MainWindow.xaml内に直接書く事もできるのですが、コード量が増えてごちゃごちゃしてしまうので今回はリソースディクショナリを作成してカスタマイズしたスタイルを読み込むようにします。
今回のプロジェクトでは、フレームワークとしてPrismを使用しています。
リソースディクショナリの作成と読み込み
プロジェクト内に適当なフォルダを作成しリソースディクショナリを格納します。今回はResourcesという名前とします。
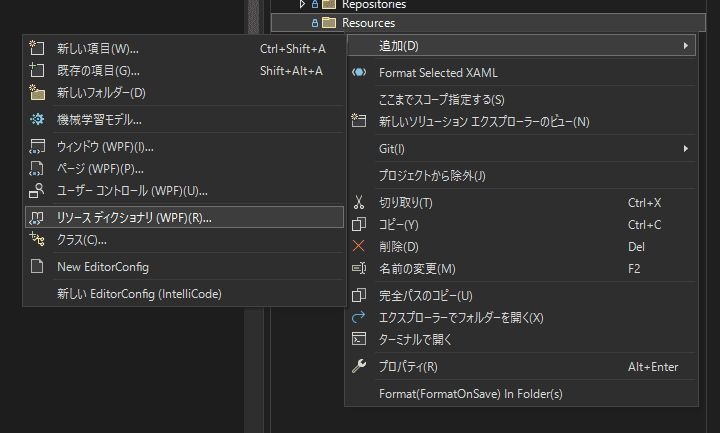
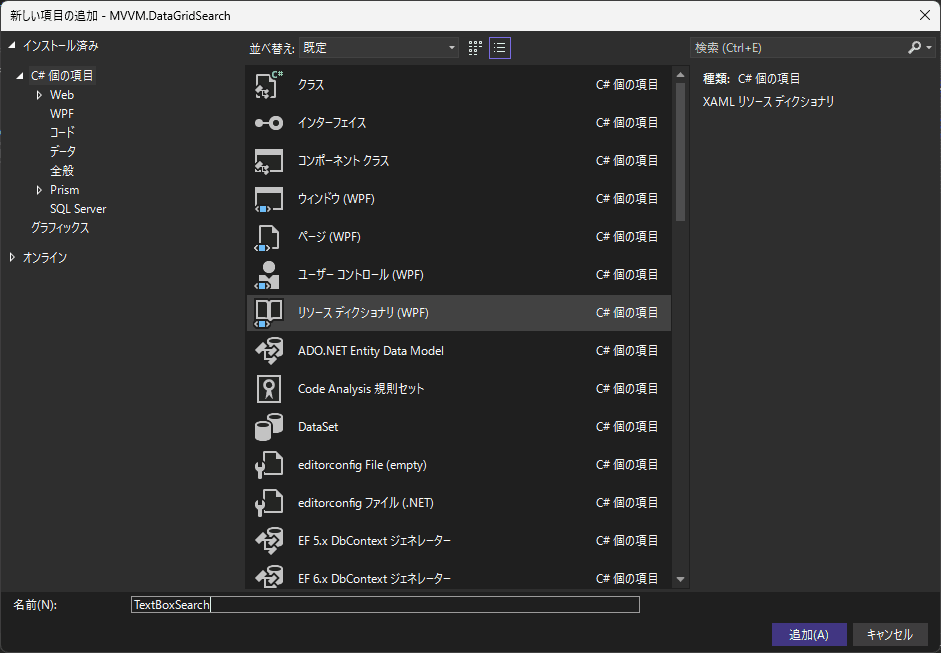
TextBoxSearchという名前のリソースディクショナリを作成します。
作成したリソースディクショナリをApp.xamlに登録します。
作成したスタイルが読み込まれない場合、このファイルに追加したリソースディクショナリが登録しているか確認してください。
<prism:PrismApplication x:Class="MVVM.DataGridSearch.App"
                        xmlns="http://schemas.microsoft.com/winfx/2006/xaml/presentation"
                        xmlns:x="http://schemas.microsoft.com/winfx/2006/xaml"
                        xmlns:Icon="http://metro.mahapps.com/winfx/xaml/iconpacks"
                        xmlns:local="clr-namespace:MVVM.DataGridSearch"
                        xmlns:prism="http://prismlibrary.com/">
    <Application.Resources>
        <ResourceDictionary>
            <ResourceDictionary.MergedDictionaries>
                <ResourceDictionary Source="Resources\TextBoxSearch.xaml" />
            </ResourceDictionary.MergedDictionaries>
        </ResourceDictionary>
    </Application.Resources>
</prism:PrismApplication>
画面上の TextBox を選択した状態で右クリック → スタイルの編集 → コピーして編集 → Style リソースの作成でTextBoxSearch.xamlを指定し、「名前(キー)」で任意の名前を指定します。
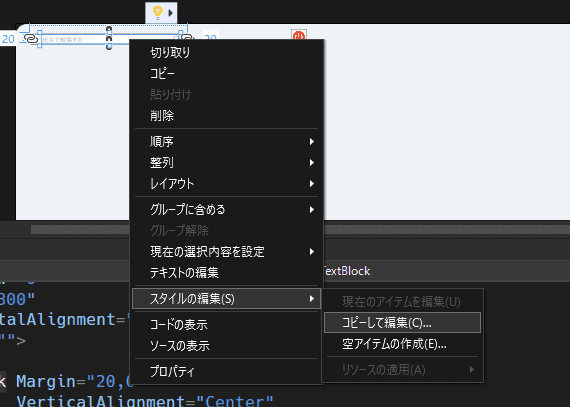
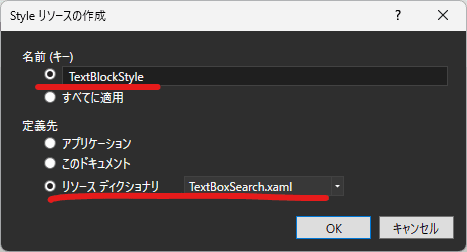
TextBoxSearch.xamlのリソースディクショナリに以下のようなコードが作成されます。
<ResourceDictionary xmlns="http://schemas.microsoft.com/winfx/2006/xaml/presentation" xmlns:x="http://schemas.microsoft.com/winfx/2006/xaml">
    <SolidColorBrush x:Key="TextBox.Static.Border" Color="#FFABAdB3" />
    <SolidColorBrush x:Key="TextBox.MouseOver.Border" Color="#FF7EB4EA" />
    <SolidColorBrush x:Key="TextBox.Focus.Border" Color="#FF569DE5" />
    <Style x:Key="TextBoxSearch" TargetType="{x:Type TextBox}">
        <Setter Property="Background" Value="{DynamicResource {x:Static SystemColors.WindowBrushKey}}" />
        <Setter Property="BorderBrush" Value="{StaticResource TextBox.Static.Border}" />
        <Setter Property="Foreground" Value="{DynamicResource {x:Static SystemColors.ControlTextBrushKey}}" />
        <Setter Property="BorderThickness" Value="1" />
        <Setter Property="KeyboardNavigation.TabNavigation" Value="None" />
        <Setter Property="HorizontalContentAlignment" Value="Left" />
        <Setter Property="FocusVisualStyle" Value="{x:Null}" />
        <Setter Property="AllowDrop" Value="true" />
        <Setter Property="ScrollViewer.PanningMode" Value="VerticalFirst" />
        <Setter Property="Stylus.IsFlicksEnabled" Value="False" />
        <Setter Property="Template">
            <Setter.Value>
                <ControlTemplate TargetType="{x:Type TextBox}">
                    <Border x:Name="border"
                            Background="{TemplateBinding Background}"
                            BorderBrush="{TemplateBinding BorderBrush}"
                            BorderThickness="{TemplateBinding BorderThickness}"
                            SnapsToDevicePixels="True">
                        <ScrollViewer x:Name="PART_ContentHost"
                                      Focusable="false"
                                      HorizontalScrollBarVisibility="Hidden"
                                      VerticalScrollBarVisibility="Hidden" />
                    </Border>
                    <ControlTemplate.Triggers>
                        <Trigger Property="IsEnabled" Value="false">
                            <Setter TargetName="border" Property="Opacity" Value="0.56" />
                        </Trigger>
                        <Trigger Property="IsMouseOver" Value="true">
                            <Setter TargetName="border" Property="BorderBrush" Value="{StaticResource TextBox.MouseOver.Border}" />
                        </Trigger>
                        <Trigger Property="IsKeyboardFocused" Value="true">
                            <Setter TargetName="border" Property="BorderBrush" Value="{StaticResource TextBox.Focus.Border}" />
                        </Trigger>
                    </ControlTemplate.Triggers>
                </ControlTemplate>
            </Setter.Value>
        </Setter>
        <Style.Triggers>
            <MultiTrigger>
                <MultiTrigger.Conditions>
                    <Condition Property="IsInactiveSelectionHighlightEnabled" Value="true" />
                    <Condition Property="IsSelectionActive" Value="false" />
                </MultiTrigger.Conditions>
                <Setter Property="SelectionBrush" Value="{DynamicResource {x:Static SystemColors.InactiveSelectionHighlightBrushKey}}" />
            </MultiTrigger>
        </Style.Triggers>
    </Style>
</ResourceDictionary>プロパティの内容を確認していきま�す。
SolidColorBrush
SolidColorBrush要素では枠線の色の定義がされています。
それぞれデフォルトの色、マウスがホバーされたときの色、テキストボックスがフォーカスされたときの色が定義されています。
<SolidColorBrush x:Key="TextBox.Static.Border" Color="#FFABAdB3" />
<SolidColorBrush x:Key="TextBox.MouseOver.Border" Color="#FF7EB4EA" />
<SolidColorBrush x:Key="TextBox.Focus.Border" Color="#FF569DE5" />このx:Key="TextBox.Static.Border"などは色の指定をした変数のようなもので、この色を使いたいボーダーの箇所でValue="{StaticResource TextBox.Static.Border}"のように指定することで使い回すことが出来ます。
Style
Style要素では、特定のコントロールの外観と動作を定義します。
TargetType属性ではスタイルが適用されるコントロールのタイプを指定します。
ここではTargetType="{x:Type TextBox}"と指定されており、TextBoxに対してのスタイルを定義していきます。
<Style x:Key="TextBoxSearch" TargetType="{x:Type TextBox}">Setter
Setter要素は WPF のスタイル内で特定のプロパティに対して値を設定するために使用されます。この値を設定することで、コントロール内の外観や動作をカスタマイズすることができます。
BackgroundやBorderBrushなど外観に関する設定がされているのが分かります。
<Setter Property="Background" Value="{DynamicResource {x:Static SystemColors.WindowBrushKey}}" />
<Setter Property="BorderBrush" Value="{StaticResource TextBox.Static.Border}" />
<Setter Property="Foreground" Value="{DynamicResource {x:Static SystemColors.ControlTextBrushKey}}" />
<Setter Property="BorderThickness" Value="1" />
<Setter Property="KeyboardNavigation.TabNavigation" Value="None" />
<Setter Property="HorizontalContentAlignment" Value="Left" />
<Setter Property="FocusVisualStyle" Value="{x:Null}" />
<Setter Property="AllowDrop" Value="true" />
<Setter Property="ScrollViewer.PanningMode" Value="VerticalFirst" />
<Setter Property="Stylus.IsFlicksEnabled" Value="False" />Value属性で指定されているDynamicResourceとStaticResourceには以下のような違いがあります。
StaticResource
- XAML が最初に読み込まれるとき(アプリケーションの起動時またはウィンドウの初期化時)にリソースを解決する
- 一度だけリソースを解決し、その後はキャッシュされた値を使用するため、パフォーマンスが高い
- リソースがアプリケーションのライフタイム中に変更されない場合に使用する。例えば、固定の色やスタイルなど
DynamicResource
- リソースが実際に必要になるまで解決を遅延させる。リソースが変更された場合、動的に更新される。
- リソースが参照されるたびに解決されるため、
StaticResourceに比べてパフォーマンスが低下する可能性がある - アプリケーション実行中にスタイルが変更される可能性がある場合に使用する。例えば、テーマの変更やユーザー設定に応じた動的なスタイル変更など。
ControlTemplate
TemplateというプロパティにControlTemplateを設定することで、デフォルトの見た目を変更できるようになっています。
<Setter Property="Template">
    <Setter.Value>
        <ControlTemplate TargetType="{x:Type TextBox}">
            <Border x:Name="border"
                    Background="{TemplateBinding Background}"
                    BorderBrush="{TemplateBinding BorderBrush}"
                    BorderThickness="{TemplateBinding BorderThickness}"
                    SnapsToDevicePixels="True">
                <ScrollViewer x:Name="PART_ContentHost"
                                Focusable="false"
                                HorizontalScrollBarVisibility="Hidden"
                                VerticalScrollBarVisibility="Hidden" />
            </Border>
            <ControlTemplate.Triggers>
                <Trigger Property="IsEnabled" Value="false">
                    <Setter TargetName="border" Property="Opacity" Value="0.56" />
                </Trigger>
                <Trigger Property="IsMouseOver" Value="true">
                    <Setter TargetName="border" Property="BorderBrush" Value="{StaticResource TextBox.MouseOver.Border}" />
                </Trigger>
                <Trigger Property="IsKeyboardFocused" Value="true">
                    <Setter TargetName="border" Property="BorderBrush" Value="{StaticResource TextBox.Focus.Border}" />
                </Trigger>
            </ControlTemplate.Triggers>
        </ControlTemplate>
    </Setter.Value>
</Setter>
主に以下の構成要素があります。
-
TargetType
- TargetType 属性は、このテンプレートが適用されるコントロールのタイプを指定します。上記の例では、TextBox コントロールに適用されます。
-
TemplateBinding
- TemplateBinding マークアップ拡張は、テンプレート内の要素のプロパティを
TargetTypeで指定している要素のプロパティにバインドします。ここでは{x:Type TextBox}が指定されており、これにより TextBox のプロパティが変更されたときにテンプレート内の要素も更新されます。
- TemplateBinding マークアップ拡張は、テンプレート内の要素のプロパティを
-
ScrollViewer
ScrollViewerはコンテンツが利用可能なスペースを超えた場合にスクロールバーを提供するコントロールです。ここでは TextBox に入力されたテキストを表示します。HorizontalScrollBarVisibilityとVerticalScrollBarVisibilityがHiddenになっているため、この TextBox 内ではスクロールは表示されません。
-
ControlTemplate.Triggers
ControlTemplate.Triggersは、特定の条件に基づいてコントロールの外観を変更するために使用されます。- 最初の
Triggerでは、TextBox が無効化されたときに、ボーダーの不透明度を 56%に設定しています。 - 2 番目は、マウスが TextBox 上にあるときに、ボーダーの色を
TextBox.MouseOver.Borderリソースで定義されている色にします。 - 3 番目は、TextBox にキーボードフォーカスがある場合に、ボーダーの色を
TextBox.Focus.Borderリソースで定義されている色にします。
TextBox の外観をカスタマイズする
これまでリソースディクショナリ内にコピーされた TextBox のスタイルの構成を見てきましたが、実際に以下のようなコードに変更して外観をカスタマイズします。
<ResourceDictionary xmlns="http://schemas.microsoft.com/winfx/2006/xaml/presentation" xmlns:x="http://schemas.microsoft.com/winfx/2006/xaml">

    <Style x:Key="textBoxSearch" TargetType="TextBox">
        <Setter Property="Background" Value="#ffffff" />
        <Setter Property="Background" Value="#ffffff" />
        <Setter Property="BorderThickness" Value="0" />
        <Setter Property="FontSize" Value="12" />
        <Setter Property="Padding" Value="15,10" />
        <Setter Property="VerticalAlignment" Value="Center" />
        <Setter Property="Margin" Value="0,10" />
        <Setter Property="Template">
            <Setter.Value>
                <ControlTemplate TargetType="TextBoxBase">
                    <Border x:Name="border"
                            Background="{TemplateBinding Background}"
                            BorderBrush="#e0e6ed"
                            BorderThickness="1"
                            CornerRadius="20"
                            SnapsToDevicePixels="True">
                        <ScrollViewer x:Name="PART_ContentHost"
                                      Focusable="False"
                                      HorizontalScrollBarVisibility="Hidden"
                                      VerticalScrollBarVisibility="Hidden" />
                    </Border>

                    <ControlTemplate.Triggers>
                        <Trigger Property="IsMouseOver" Value="True">
                            <Setter TargetName="border" Property="BorderBrush" Value="#7DB0DE" />
                        </Trigger>

                        <Trigger Property="IsKeyboardFocused" Value="True">
                            <Setter TargetName="border" Property="BorderBrush" Value="red" />
                        </Trigger>
                    </ControlTemplate.Triggers>
                </ControlTemplate>
            </Setter.Value>
        </Setter>
    </Style>
</ResourceDictionary>MainWindow.xamlの TextBox に適応します。
<Window x:Class="MVVM.DataGridSearch.Views.MainWindow"
        xmlns="http://schemas.microsoft.com/winfx/2006/xaml/presentation"
        xmlns:x="http://schemas.microsoft.com/winfx/2006/xaml"
        xmlns:Icon="http://metro.mahapps.com/winfx/xaml/iconpacks"
        xmlns:bh="http://schemas.microsoft.com/xaml/behaviors"
        xmlns:prism="http://prismlibrary.com/"
        Title="{Binding Title}"
        Width="1080"
        Height="720"
        prism:ViewModelLocator.AutoWireViewModel="True"
        AllowsTransparency="True"
        Background="Transparent"
        WindowStartupLocation="CenterScreen"
        WindowStyle="None">
<Window.Resources>
    <BooleanToVisibilityConverter x:Key="BoolToVis" />
</Window.Resources>

<!-- 省略 -->

<Grid Grid.Row="0"
    Width="300"
    HorizontalAlignment="Left">

    <TextBlock Margin="20,0"
               VerticalAlignment="Center"
               Panel.ZIndex="1"
               Foreground="#b0b9c6"
               IsHitTestVisible="False"
               Text="氏名で検索する"
               Visibility="{Binding IsTextEmpty, Converter={StaticResource BoolToVis}}" />

    <TextBox x:Name="txtSearch"
             Style="{StaticResource textBoxSearch}"
             Text="{Binding SearchText, UpdateSourceTrigger=PropertyChanged}" />

    <Border Width="15"
            Height="15"
            Margin="0,0,15,0"
            HorizontalAlignment="Right"
            VerticalAlignment="Center"
            Panel.ZIndex="1"
            Background="Transparent"
            Cursor="Hand">
        <Icon:PackIconMaterial Foreground="#b0b9c6" Kind="Magnify" />
        <bh:Interaction.Triggers>
            <bh:EventTrigger EventName="MouseLeftButtonDown">
                <bh:InvokeCommandAction Command="{Binding SearchCommand}" />
            </bh:EventTrigger>
        </bh:Interaction.Triggers>
    </Border>
</Grid>TextBoxにはプレースホルダーを表示するプロパティは無いので、TextBlockのテキストを重ねています。
Converter={StaticResource BoolToVis}は、バインディングの値を変換するためのコンバーターです。ここでは、BooleanToVisibilityConverterというクラスをリソースとして読み込んで、BoolToVisという名前で XAML 内で使用するよう指定しています。
このクラスはカスタムコンバーターではなく標準で実装されているクラスです。

trueの場合はVisibility.Visibleが返却され(表示)、falseの場合はVisibility.Collapsedが返却されます(非表示)。
ViewModel側のプロパティの実装は以下のようになっています。
using Prism.Commands;
using Prism.Mvvm;
using System;
using System.Collections.ObjectModel;
using System.Windows;

namespace MVVM.DataGridSearch.ViewModels
{
    public class MainWindowViewModel : BindableBase
    {
        public bool IsTextEmpty => string.IsNullOrWhiteSpace(SearchText);

        public string SearchText
        {
            get => _searchText;
            set
            {
                if(SetProperty(ref _searchText, value))
                {
                    RaisePropertyChanged(nameof(IsTextEmpty));
                    FilterItems();
                }
            }
        }
        private string _searchText;
    }
}BooleanToVisibilityConverterと紐づける為のプロパティとしてIsTextEmptyを実装しています。
ここまで実��装してビルドしてみると以下のような外観になりました。

虫眼鏡のアイコンには MahApps.Metro.IconPacks を使用しています。
デフォルトのスタイルをカスタマイズしたり、アイコンを使用したりすることでだいぶ業務アプリっぽいデザインから改善されるのではないかと思います。
次回は同様に DataGrid のスタイルをカスタマイズする方法の記事を書いていきます。
