はじめに
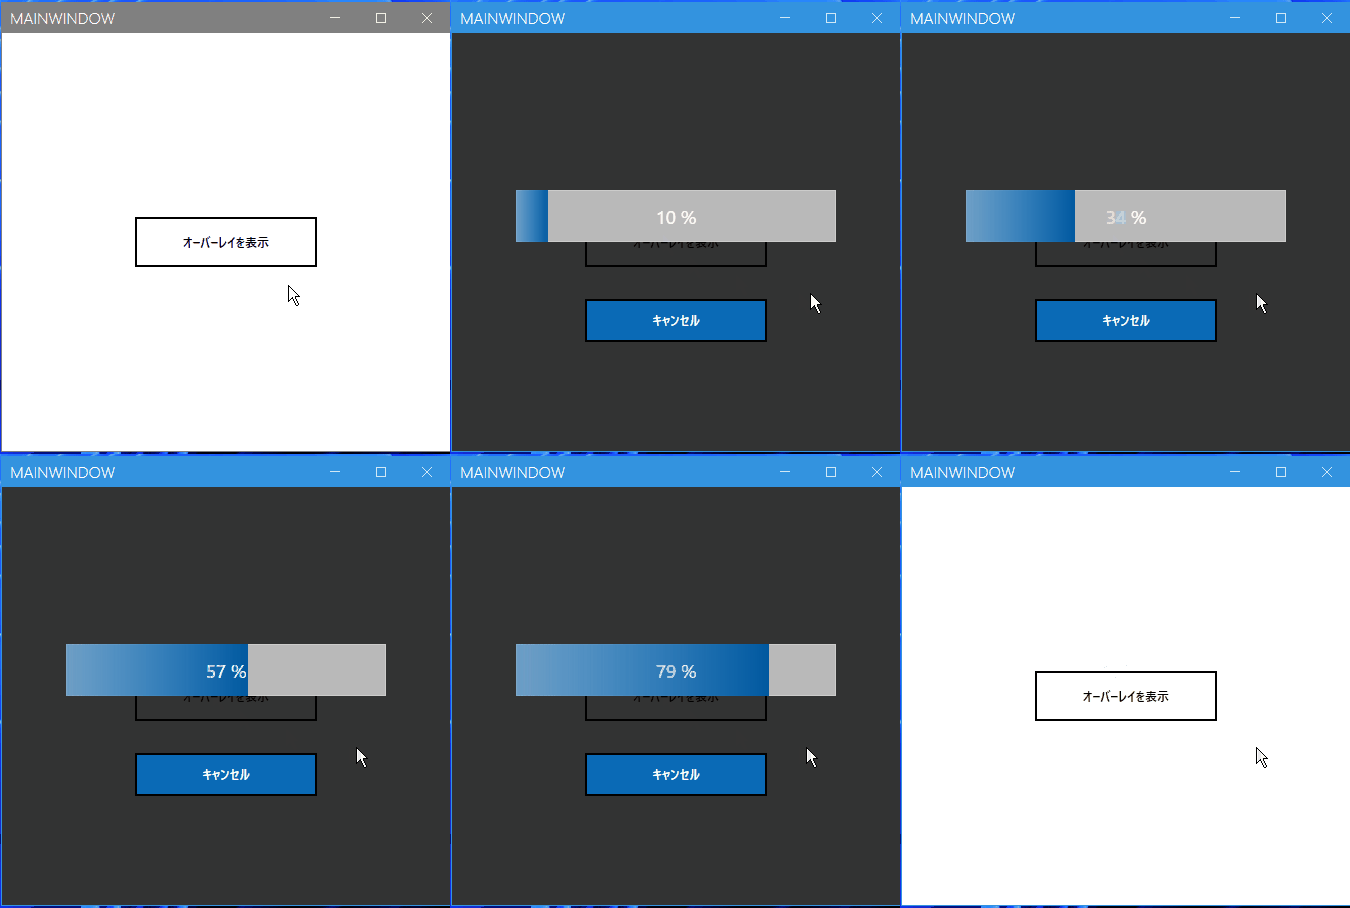
WPF で作成したアプリケーションで、通信中にオーバーレイを表�示させ、その処理の進捗率を表示させるプログレスバーを実装した画面を作ったのでその備忘録になります。
環境
- Visual Studio 2022
- .NET6
- MahApps.Metro: 2.4.9
完成形
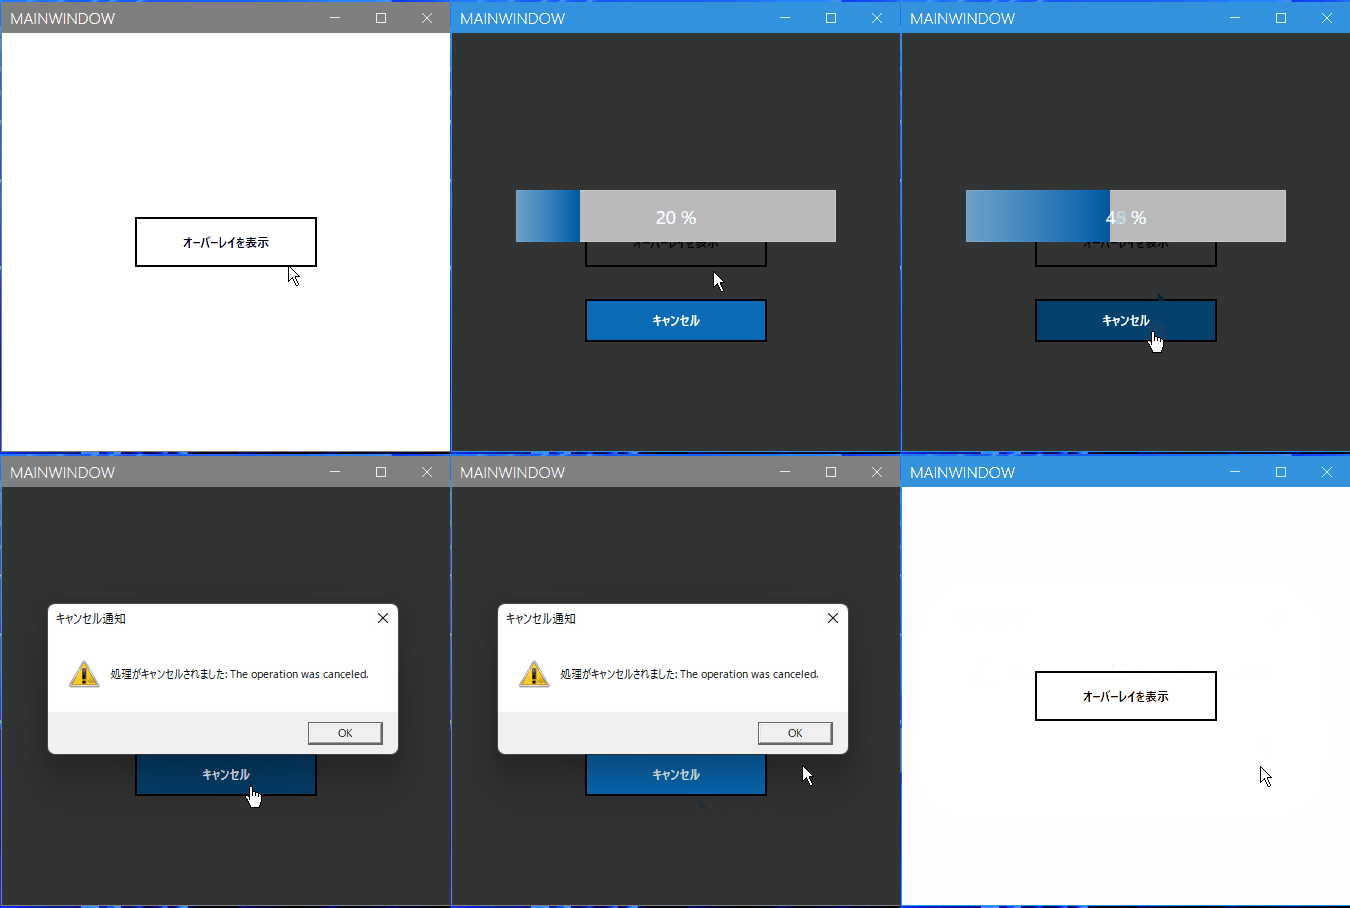
作成したアプリケーションのデモです。
プログレスバーを表示

プログレスバー表示中に処理をキャンセル

実装したコード
MVVM に関しては過去にまとめたこちらの記事も参考にして下さい。
また、今回実装したコードの GitHub のリポジトリです。
今回は Model で取得するデータが大きいことを想定して実装していきます。
オーバーレイのレイアウト
プログレスバーを表示させるウィンドウには UserControl を使用します。プロジェクトからユーザーコントロール(WPF)を追加します。
そして追加した UserControl を以下のように修正します。
<UserControl x:Class="MVVM.OverlayOnProgressBar.View.Overlay"
             xmlns="http://schemas.microsoft.com/winfx/2006/xaml/presentation"
             xmlns:x="http://schemas.microsoft.com/winfx/2006/xaml"
             xmlns:d="http://schemas.microsoft.com/expression/blend/2008"
             xmlns:mc="http://schemas.openxmlformats.org/markup-compatibility/2006"
             d:DesignHeight="450"
             d:DesignWidth="450"
             mc:Ignorable="d">
    <Grid>
        <!--  黒の背景を画面全体に表示する  -->
        <Rectangle Fill="#000" Opacity="0.8" />

        <StackPanel Margin="32" VerticalAlignment="Center">
            <ProgressBar Height="40"
                         IsIndeterminate="False"
                         Style="{StaticResource MahApps.Styles.ProgressBar}"
                         Value="{Binding ProgressValue}" />

            <TextBlock Height="40"
                       Margin="0,16,0,0"
                       HorizontalAlignment="Center"
                       VerticalAlignment="Center"
                       FontSize="14pt"
                       Foreground="White"
                       Text="{Binding ProgressPercentage}" />

            <StackPanel Margin="0,16,0,0">
                <Button Height="40"
                        Command="{Binding ProgressCancelCommand}"
                        Content="キャンセル"
                        Cursor="Hand"
                        Style="{StaticResource MahApps.Styles.Button.Square.Accent}" />
            </StackPanel>
        </StackPanel>
    </Grid>
</UserControl>Overlay.xaml.cs側には特に記述��はありません。
MainWindow.xamlは以下のように記述します。
<mah:MetroWindow x:Class="MVVM.OverlayOnProgressBar.MainWindow"
                 xmlns="http://schemas.microsoft.com/winfx/2006/xaml/presentation"
                 xmlns:x="http://schemas.microsoft.com/winfx/2006/xaml"
                 xmlns:d="http://schemas.microsoft.com/expression/blend/2008"
                 xmlns:mah="http://metro.mahapps.com/winfx/xaml/controls"
                 xmlns:mc="http://schemas.openxmlformats.org/markup-compatibility/2006"
                 xmlns:ovl="clr-namespace:MVVM.OverlayOnProgressBar.View" <-★名前空間を追加する
                 Title="MainWindow"
                 Width="450"
                 Height="450"
                 WindowStartupLocation="CenterScreen"
                 mc:Ignorable="d">
    <Grid>

        <!--  UserControlを呼び出す  -->
        <Grid Panel.ZIndex="999" Visibility="{Binding IsOverlay}">
            <ovl:Overlay />
        </Grid>

        <StackPanel HorizontalAlignment="Center"
                    VerticalAlignment="Center"
                    Orientation="Horizontal">

            <Button Width="200"
                    Height="50"
                    Command="{Binding ShowOverlayButtonCommand}"
                    Content="オーバーレイを表示"
                    Cursor="Hand"
                    Style="{StaticResource MahApps.Styles.Button.Square}" />

        </StackPanel>
    </Grid>
</mah:MetroWindow>ポイントとして、作成したOverlay.xamlを使用できるように名前空間を追加して呼び出す記述を追記します。
ViewModel の実装
少し長いコードになりますが、メインウィンドウにバインドさせる ViewModel は以下の様に実装します。
using MVVM.OverlayOnProgressBar.Command;
using MVVM.OverlayOnProgressBar.Model;
using MVVM.OverlayOnProgressBar.Object;
using System;
using System.Threading; // CancellationTokenSource を使用するのに追加
using System.Threading.Tasks;
using System.Windows;

namespace MVVM.OverlayOnProgressBar.ViewModel
{
    public class MainWIndowViewModel : ViewModelBase
    {
        /// <summary>
        /// 取り消す必要があることを CancellationToken に通知する
        /// </summary>
        private CancellationTokenSource? _cancelToken;

        #region コマンド

        public DelegateCommand ShowOverlayButtonCommand
            => _showOverlayButtonCommand ?? (_showOverlayButtonCommand = new DelegateCommand(OnShowOverlay));

        private DelegateCommand _showOverlayButtonCommand;

        public DelegateCommand ProgressCancelCommand
            => _progressCancelCommand ?? (_progressCancelCommand = new DelegateCommand(OnProgressCancel));

        private DelegateCommand _progressCancelCommand;

        #endregion

        #region データバインディングさせているプロパティ

        /// <summary>
        /// 「%」を表示させる
        /// </summary>
        public string? ProgressPercentage
        {
            get => _progressPercentage;

            set => SetProperty(ref _progressPercentage, value);
        }
        private string? _progressPercentage;

        /// <summary>
        /// オーバーレイの表示・非表示を切り替えるプロパティ
        /// </summary>
        public string IsOverlay
        {
            get => _isOverlay;
            set => SetProperty(ref _isOverlay, value);
        }
        private string _isOverlay = "Hidden";

        /// <summary>
        /// プログレスバーのカウンターを表示する
        /// </summary>
        public float ProgressValue
        {
            get => _progressValue;
            set => SetProperty(ref _progressValue, value);
        }
        private float _progressValue = 0;

        #endregion

        /// <summary>
        /// コンストラクタ
        /// </summary>
        public MainWIndowViewModel()
        { }

        /// <summary>
        /// オーバーレイを表示
        /// </summary>
        private void OnShowOverlay()
        {
            Task.Run(async () =>
            {

                IsOverlay = "Visible";

                // 進捗状況を管理する Progressクラスに、自作した ProgressInfoクラスを渡す
                var p = new Progress<ProgressInfo>();

                // 進捗値が変更されるたびに呼ばれるイベントハンドラーにラムダ式で実行するメソッドを追加
                p.ProgressChanged += (o, e) =>
                {
                    // 変更後の値をプロパティに格納及び更新
                    ProgressValue = e.ProgressValue;
                    // TextBlockに表示させる文字列を更新する
                    ProgressPercentage = $"{e.ProgressValue} %";
                };

                using (_cancelToken = new CancellationTokenSource())
                {

                    try
                    {
                        // データを取得するモデルをインスタンス化
                        FetchApiModel apiModel = new FetchApiModel();

                        // データを取得する処理(非同期)を実行
                        // CancellationTokenSource インスタンスを引数に渡す
                        await apiModel.FetchApiEndPoint(p, _cancelToken);

                        IsOverlay = "Hidden";
                        ProgressValue = 0;

                    }
                    // スレッドが実行している操作のキャンセル時にスレッドにスローされる例外
                    catch (OperationCanceledException ex)
                    {
                        ShowMessageBox(ex.Message, "キャンセル通知");

                        IsOverlay = "Hidden";
                        ProgressValue = 0;

                        return;
                    }
                }

            });

        }

        /// <summary>
        /// メッセージボックス表示
        /// </summary>
        /// <param name="message">メッセージ</param>
        /// <param name="caption">キャプション</param>
        private void ShowMessageBox(string message, string caption)
        {
            MessageBox.Show($"処理がキャンセルされました: {message}",
                            caption,
                            MessageBoxButton.OK,
                            MessageBoxImage.Exclamation);
        }

        /// <summary>
        /// キャンセル処理
        /// </summary>
        private void OnProgressCancel()
        {
            // キャンセル処理を実行して、OperationCanceledException に例外を投げる
            _cancelToken.Cancel();
        }
    }
}
ここでポイントとなるのが、Model のメソッド実行時にusing (_cancelToken = new CancellationTokenSource())で作成したトークンを渡していることです。
これによりこのトークンに対してキャンセル通知があった場合に、OperationCanceledExceptionに例外が投げられるので Model 側の処理が停止することができます。
キャンセル通知を通達するのはExecuteProgressCancel()で実行している処理で��す。
また、IProgressに実装されているvoid Report(T value)を使用して進捗の通知をします。ProgressオブジェクトはIProgressインターフェースを継承しているのでProgress<ProgressInfo> progress, ...ではなく、IProgress<ProgressInfo> progress, ...という引数の受け方ができます。
さらに関連するコードとして、以下にFetchApiModel.csのコードを記述します。
using MVVM.OverlayOnProgressBar.Object;
using System;
using System.Threading;
using System.Threading.Tasks;

namespace MVVM.OverlayOnProgressBar.Model
{
    public class FetchApiModel
    {
        /// <summary>
        /// ダミーAPI
        /// </summary>
        /// <param name="progress">進捗通知クラス</param>
        /// <param name="cancelToken">キャンセル通知クラス</param>
        /// INFO: IProgress -> 進行状況の更新のプロバイダーを定義
        public async Task FetchApiEndPoint(IProgress<ProgressInfo> progress, CancellationTokenSource cancelToken)
        {
            for (int i = 0; i <= 100; i++)
            {
                // CancellationTokenSource.Tokenプロパティ: この CancellationToken に関連付けられている CancellationTokenSource を取得します。
                // ThrowIfCancellationRequestedメソッド: このトークンに対して取り消しが要求された場合、OperationCanceledException をスローします。
                cancelToken.Token.ThrowIfCancellationRequested();

                // 状況通知メソッド Report() に、現在の進捗状況を格納したインスタンスを渡す
                progress.Report(new ProgressInfo(i));

                // 進捗率を程よく遅らせる
                await Task.Delay(30);

            }
        }
    }
}関連するProgressInfoクラスのコードです。
ただインスタンス生成時に値を受け取るだけのシンプルなクラスとなっています。
namespace MVVM.OverlayOnProgressBar.Object
{
    public sealed class ProgressInfo
    {
        /// <summary>
        /// 進捗値
        /// </summary>
        public float ProgressValue { get; }

        /// <summary>
        /// コンストラクタ
        /// </summary>
        /// <param name="value">進捗値</param>
        public ProgressInfo(float value)
        {
            ProgressValue = value;
        }
    }
}今回作成したアプリケーションのリポジトリはこちらになります。
まとめ
今回作成したアプリケーションは、コードビハンドで実装されている例は多かったのですが、MVVM で実装したい事情があり調べてみたら例が少なかったので記事にまとめました。
ポイントとして
- キャンセル通知をするためのトークンを ViewModel で作成する
- そのトークンを Model 側で実行するメソッドに渡す
- Model 側のメソッドでプログレスの進捗カウント毎にキャンセルを補足する
ThrowIfCancellationRequestedメソッドを実行しておく - ViewMode 側でキャンセルボタンが押されたら
_cancelToken.Cancel()を実行してOperationCanceledExceptionに例外を投げる

