はじめに
Windows のデスクトップアプリの開発ですが現在は WPF で作成することが多く、まだふわっとした MVVM アーキテクチャの理解を深めるため本記事を書きました。
MVVM とは?
MVVM とはソフトウェアアーキテクチャの一つで、アプリケーション構造の内部構造を以下の図ように、Model - ViewModel - Viewに大別します。この時に、View - ViewModelでデータを連携する手段としてデータバインディング機能を利用します。

Prism Library 5.0 for WPF より引用
Model とは?
Model ではアプリケーションが扱うデータの処理を行い、データの変更を View に通知するという役割を担っています。
アプリケーション外部(データベースやテキストファイルなど)とのやり取りも Model で行います。
View とは?
View はユーザーが操作する画面そのもので、Model が取得してきたデータを表示させたり、ユーザーのボタン操作のイベントなどを受け取ったりする役割があります。
ViewModel とは?
Model と View を紐づける役割を果たします。「紐づける」といは具体的に、Model からデータを受け取り ViewModel のデータが変更された時、即座に View にも反映させる処理を行います。
データバインディングとは?
データバインディングとは、アプリ UI である View と View Model を結び付ける仕組みのことです。
データバインディングの特徴として、View と ViewModel のどちらかで値が書き換われば、値が変化するたびに両方の値が変更される点が挙げられます。
それは、ユーザーが画面操作をして値を書き換えたり、Model がデータを取得した時に値が書き換わった場合でも画面に反映されることを意味します。
コードで見る MVVM パターンの動き
MVVM パターンでは、View は ViewModel が公開しているプロパティを参照して View に反映させます。このとき、ViewModel のプロパティが変更されたことを知るために必要なのがINotifyPropertyChanged インターフェースです。このインターフェースは、WPF の仕組みに備わっている機能です。
とりあえずディレクトリに分けずに各クラスを作成します。また後ほどModel - ViewModel - Viewに分けていきます。
Modelを作成- 作成するクラスは
FetchTextModelとする
- 作成するクラスは
ViewModelを作成- 作成するクラスは
MainWindowViewModelとする
- 作成するクラスは
因みに今回使用するアプリは、過去の記事で解説したMahApps.Metroを導入しています。UI に関するライブラリの導入ですが良ければそちらの記事も参考にしてください。
ViewModel を実装する
ここではINotifyPropertyChangedを組み込んで、View とバインドさせる ViewModel を作成していきます。
using System.ComponentModel; // 追加する

namespace MVVM_Test_App
{
    internal class MainWindowViewModel : INotifyPropertyChanged
    {
        public event PropertyChangedEventHandler? PropertyChanged;
    }
}INotifyPropertyChangedインターフェースを継承してPropertyChangedを実装します。
INotifyPropertyChangedインターフェースにフォーカスを当てて F12 で、内部のコードが見れます。
イベントハンドラーのみ定義されているシンプルな内容となっています。
#region アセンブリ System.ObjectModel, Version=6.0.0.0, Culture=neutral, PublicKeyToken=b03f5f7f11d50a3a
// C:\Program Files\dotnet\packs\Microsoft.NETCore.App.Ref\6.0.5\ref\net6.0\System.ObjectModel.dll
// Decompiled with ICSharpCode.Decompiler 6.1.0.5902
#endregion

namespace System.ComponentModel
{
    //
    // 概要:
    //     プロパティ値が変更されたことをクライアントに通知する。
    public interface INotifyPropertyChanged
    {
        //
        // 概要:
        //     プロパティの値が変更されたときに発生する。
        event PropertyChangedEventHandler? PropertyChanged;
    }
}またPropertyChangedEventHandlerのコードを見てみるとデリゲート型であることが分かります。
#region アセンブリ System.ObjectModel, Version=6.0.0.0, Culture=neutral, PublicKeyToken=b03f5f7f11d50a3a
// C:\Program Files\dotnet\packs\Microsoft.NETCore.App.Ref\6.0.25\ref\net6.0\System.ObjectModel.dll
#endregion

#nullable enable


namespace System.ComponentModel
{
    //
    // 概要:
    //      コンポーネントのプロパティが変更されたときに発生するイベント PropertyChanged を処理するメソッドを表します。
    //      イベントが発生します。
    //
    // パラメーター:
    //   sender:
    //     イベントのソース。
    //
    //   e:
    //     イベントデータを含む System.ComponentModel.PropertyChangedEventArgs。
    public delegate void PropertyChangedEventHandler(object? sender, PropertyChangedEventArgs e);
}
デリゲートについては以下の記事で解説しているので気なる方は読んでみてください。
それでは、簡単な View を作成してINotifyPropertyChangedインターフェースを実装した ViewModel をデータバインディングさせる例を作成してみます。
View を以下のように書き換えます。
<mah:MetroWindow
    x:Class="MVVM.SampleMahApps.Metro.MainWindow"
    xmlns="http://schemas.microsoft.com/winfx/2006/xaml/presentation"
    xmlns:x="http://schemas.microsoft.com/winfx/2006/xaml"
    xmlns:d="http://schemas.microsoft.com/expression/blend/2008"
    xmlns:local="clr-namespace:MVVM.SampleMahApps.Metro"
    xmlns:mah="http://metro.mahapps.com/winfx/xaml/controls"
    xmlns:mc="http://schemas.openxmlformats.org/markup-compatibility/2006"
    Title="MainWindow"
    Width="450"
    Height="450"
    mc:Ignorable="d">

    <Grid Margin="32">
        <Grid.RowDefinitions>
            <RowDefinition Height="Auto" />
            <RowDefinition Height="Auto" />
            <RowDefinition Height="Auto" />
            <RowDefinition Height="Auto" />
        </Grid.RowDefinitions>

        <StackPanel Grid.Row="0" Margin="5">
            <TextBox
                Height="60"
                HorizontalAlignment="Stretch"
                VerticalContentAlignment="Center"
                FontSize="16"
                Text="テキストボックスです" />
        </StackPanel>

        <StackPanel Grid.Row="1" Margin="5">
            <TextBlock
                VerticalAlignment="Center"
                FontSize="16"
                Style="{StaticResource MahApps.Styles.TextBlock}"
                Text="テキストブロックです" />
        </StackPanel>

        <StackPanel
            Grid.Row="2"
            Margin="5"
            VerticalAlignment="Center">
            <Button
                Height="60"
                Command="{Binding ExecuteFetchTextDataButton}"
                Content="アクセントが効いた四角いボタン"
                Style="{StaticResource MahApps.Styles.Button.Square.Accent}" />
        </StackPanel>
    </Grid>
</mah:MetroWindow>
この時点での画面をビルドして確認します。
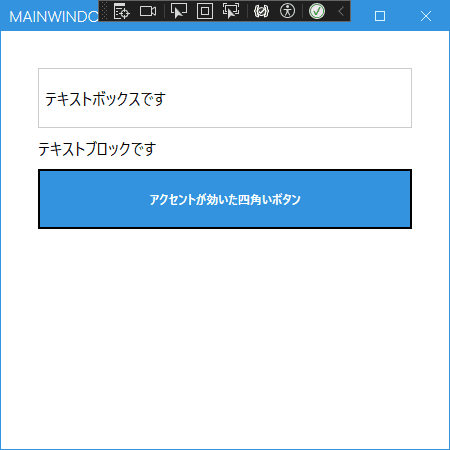
次にプロパティ変更通知を行うために、INotifyPropertyChangedインターフェースをMainWindowViewModelに実装します。
TextBox では値が入っていない状態も想定されるのでstring?としてnull を許容します。
using System.ComponentModel;
using System.Runtime.CompilerServices;

namespace MVVM_Test_App
{
    internal class MainWindowViewModel : INotifyPropertyChanged
    {
        // プロパティの変更時に発火する
        // nullが代入されることもあるので、? を付けて「null 許容値型」とする
        public event PropertyChangedEventHandler? PropertyChanged;

        private string? _textBoxValue;

        public string? TextBoxValue
        {
            get { return _textBoxValue; }
            set
            {
                // 現在の値と変更があった場合の処理
                if (_textBoxValue != value)
                {
                    // 変更があった値をプロパティに代入
                    _textBoxValue = value;
                    // TextBoxValueプロパティに変更があったことを通知する
                    OnPropertyChanged("TextBoxValue");
                }
            }
        }

        /// <summary>
        /// PropertyChangedEventArgsを発火させる
        /// </summary>
        /// <param name="propertyName">プロパティ名</param>
        protected virtual void OnPropertyChanged([CallerMemberName] string propertyName = null)
        {
            PropertyChanged?.Invoke(this, new PropertyChangedEventArgs(propertyName));
        }
    }
}MainWindowViewModelでは、publicとして公開しているプロパティ(バインディングしているプロパティ)の値に変更があればViewに通知する必要があります。
そのため、プロパティ内のsetの処理の中でプロパティに変更があったことを通知するOnPropertyChangedメソッドを実行する必要があります。
/// <summary>
/// PropertyChangedEventArgsを発火させる
/// </summary>
/// <param name="propertyName">プロパティ名</param>
protected virtual void OnPropertyChanged([CallerMemberName] string propertyName = null)
{
    PropertyChanged?.Invoke(this, new PropertyChangedEventArgs(propertyName));
}引数に定義されている[CallerMemberName]というのは、Csharp の属性という機能を利用しています。
属性とは、クラスやメソッドに情報を追加することが出来ます。
[CallerMemberName]を利用するとメソッドのオプション引数として呼び出して、呼び出し元のメソッド名やプロパティ名を取得できるようになります。
ここでは、set内でOnPropertyChanged("TextBoxValue");と引数にあえてプロパティ名を渡していますが、[CallerMemberName]によって呼び出し元のメソッドのプロパティ名を取得できているので、OnPropertyChanged();と引数を指定しなくても正常に動作します。
プロパティ名が増えてきたときなど、わざわざ引数に値を入れなくても良かったり、修正や実装忘れがなくなるメリットがあります。
また、引数に渡されているthisは、プロパティ変更の通知をする ViewModel 自身を渡しています。こうすることでイベントが発生した具体的なオブジェクト(ViewModel)を把握することができます。
第二引数に渡しているnew PropertyChangedEventArgs(propertyName)は、変更されたプロパティ名を渡すことで UI 側にどのプロパティが変更されたのか通知することが出来ます。
この実装により View(UI 側)と ViewModel 間のデータバインディングの実現が可能になります。
using System.ComponentModel;
using System.Runtime.CompilerServices;
namespace MVVM_Test_App
{
internal class MainWindowViewModel : INotifyPropertyChanged
{
// プロパティの変更時に発火する
public event PropertyChangedEventHandler? PropertyChanged;
private string? _textBoxValue;
public string? TextBoxValue
{
get { return _textBoxValue; }
set
{
// 現在の値と変更があった場合の処理
if (_textBoxValue != value)
{
// 変更があった値をプロパティに代入
_textBoxValue = value;
// TextBoxValueプロパティに変更があったことを通知する
OnPropertyChanged(); // プロパティ名の記述を削除
}
}
}
/// <summary>
/// PropertyChangedEventArgsを発火させる
/// </summary>
/// <param name="propertyName">プロパテ��ィ名</param>
protected virtual void OnPropertyChanged([CallerMemberName] string propertyName = null)
{
PropertyChanged?.Invoke(this, new PropertyChangedEventArgs(propertyName));
}
}
}それではView側でデータバインディング出来るようにコードを書き換えます。
<mah:MetroWindow
    x:Class="MVVM.SampleMahApps.Metro.MainWindow"
    xmlns="http://schemas.microsoft.com/winfx/2006/xaml/presentation"
    xmlns:x="http://schemas.microsoft.com/winfx/2006/xaml"
    xmlns:d="http://schemas.microsoft.com/expression/blend/2008"
    xmlns:local="clr-namespace:MVVM.SampleMahApps.Metro"
    xmlns:mah="http://metro.mahapps.com/winfx/xaml/controls"
    xmlns:mc="http://schemas.openxmlformats.org/markup-compatibility/2006"
    Title="MainWindow"
    Width="450"
    Height="450"
    mc:Ignorable="d">

    <Grid Margin="32">
        <Grid.RowDefinitions>
            <RowDefinition Height="Auto" />
            <RowDefinition Height="Auto" />
            <RowDefinition Height="Auto" />
            <RowDefinition Height="Auto" />
        </Grid.RowDefinitions>

        <StackPanel Grid.Row="0" Margin="5">
            <TextBox
                Height="60"
                HorizontalAlignment="Stretch"
                VerticalContentAlignment="Center"
                FontSize="16"
                Text="{Binding TextBoxValue, UpdateSourceTrigger=PropertyChanged}" />
        </StackPanel>

        <StackPanel Grid.Row="1" Margin="5">
            <TextBlock
                VerticalAlignment="Center"
                FontSize="16"
                Style="{StaticResource MahApps.Styles.TextBlock}"
                Text="{Binding TextBoxValue}" />
        </StackPanel>

        <StackPanel
            Grid.Row="2"
            Margin="5"
            VerticalAlignment="Center">
            <Button
                Height="60"
                Command="{Binding ExecuteFetchTextDataButton}"
                Content="アクセントが効いた四角いボタン"
                Style="{StaticResource MahApps.Styles.Button.Square.Accent}" />
        </StackPanel>
    </Grid>
</mah:MetroWindow>
さらに、MainWindow.xamlコードビハインドであるMainWindow.xaml.csで DataContext に インスタンス化したMainWindowViewModelを渡して、ViewModel が保持するプロパティとの結びつけを行います。
namespace MVVM_Test_App
{
    /// <summary>
    /// Interaction logic for MainWindow.xaml
    /// </summary>
    public partial class MainWindow : MetroWindow
    {
        public MainWindow()
        {
            InitializeComponent();

            // xaml側で {Binding プロパティ名} と指定した箇所と
            // MainWindowViewModel で public と公開したプロパティが結びつく
            this.DataContext = new MainWindowViewModel();
        }
    }
}
ViewModel と DataContext の対応付は、XAML 側でも指定できます。
<mah:MetroWindow
    x:Class="MVVM_Test_App.MainWindow"
    xmlns="http://schemas.microsoft.com/winfx/2006/xaml/presentation"
    xmlns:x="http://schemas.microsoft.com/winfx/2006/xaml"
    xmlns:d="http://schemas.microsoft.com/expression/blend/2008"
    xmlns:local="clr-namespace:MVVM_Test_App" <-- 名前空間の記述がなければ追加する
    xmlns:mah="http://metro.mahapps.com/winfx/xaml/controls"
    xmlns:mc="http://schemas.openxmlformats.org/markup-compatibility/2006"
    Title="MainWindow"
    Width="450"
    Height="450"
    mc:Ignorable="d">
    <!-- DataContext に MainWindowViewModel を指定 -->
    <Window.DataContext>
        <local:MainWindowViewModel/>
    </Window.DataContext>
    <Grid>
    <!-- 中略 -->
それでは、一度ビルドして動きを確認してみましょう。
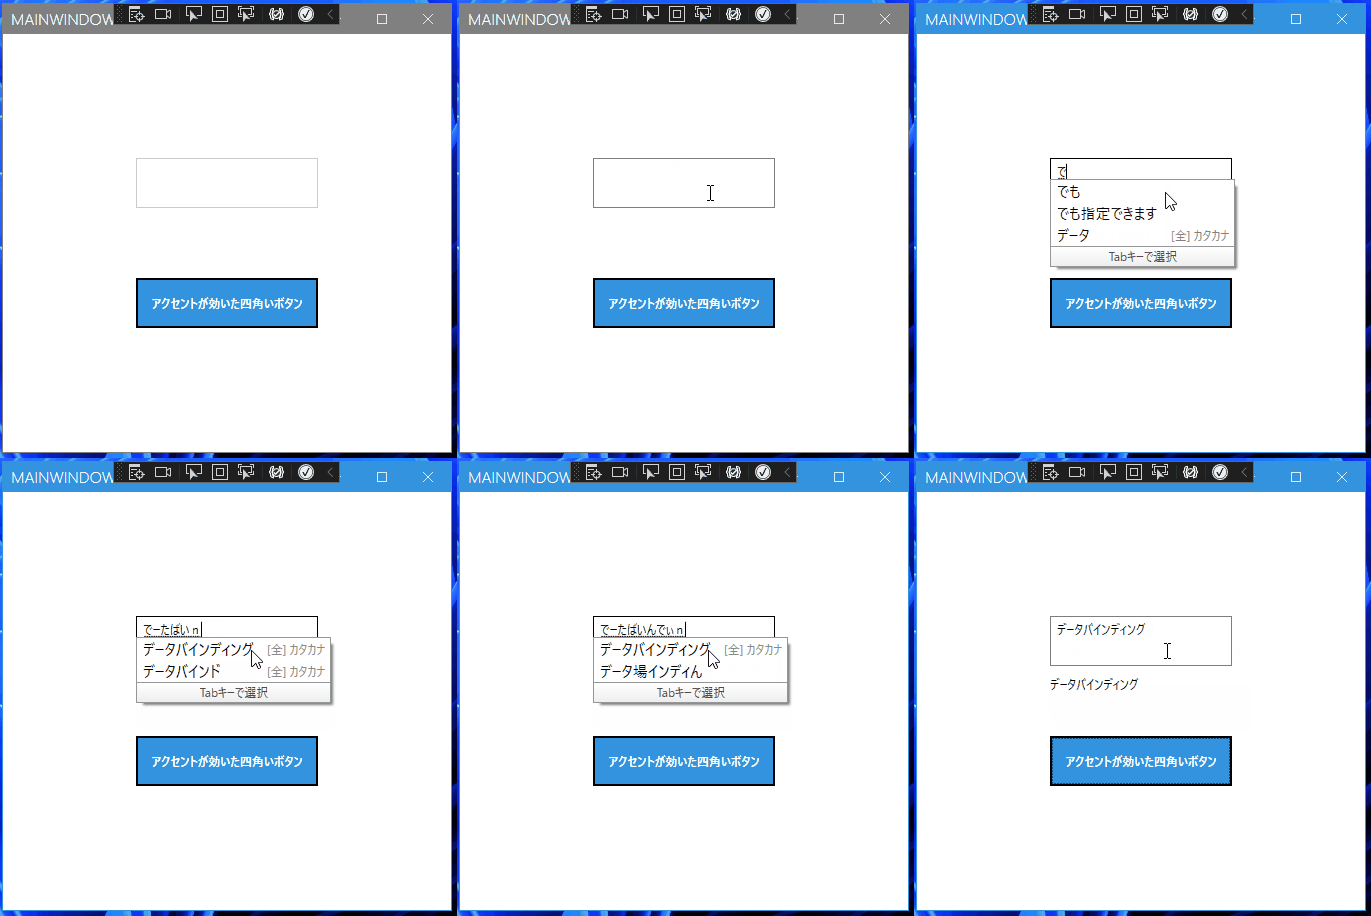
TextBox に入力した値が入力後フォーカスを外すと、TextBlock に表示されています。
Text プロパティの変更によって TextBox と TextBlock に設定したTextBoxValueの通知が View 側にも伝わっていることが分かります。
通知のタイミングを変��更
View 側からのプロパティ変更通知のタイミングは、デフォルトではLostFocusとなっており、フォーカスを失ったときに通知されるようになっています。
テキストの内容を変更した時点で MainWindowViewModel 側に通知する場合は、バインディングのUpdateSourceTriggerをPropertyChangedに変更します。
TextBox テキストでソースを更新するタイミングを制御する
<!-- 中略 -->
<TextBox
    Grid.Row="2"
    Grid.Column="2"
    Grid.ColumnSpan="3"
    Margin="5"
    Text="{Binding TextBoxValue, UpdateSourceTrigger=PropertyChanged}" />
<TextBlock
    Grid.Row="3"
    Grid.Column="2"
    Grid.ColumnSpan="3"
    Margin="5"
    Text="{Binding TextBoxValue}"/>
<Button
    Grid.Row="4"
    Grid.Column="2"
    Grid.ColumnSpan="3"
    Margin="5"
    Content="アクセントが効いた四角いボタン"
    Style="{StaticResource MahApps.Styles.Button.Square.Accent}" />
こちらも設定後の動きを確認してみます。
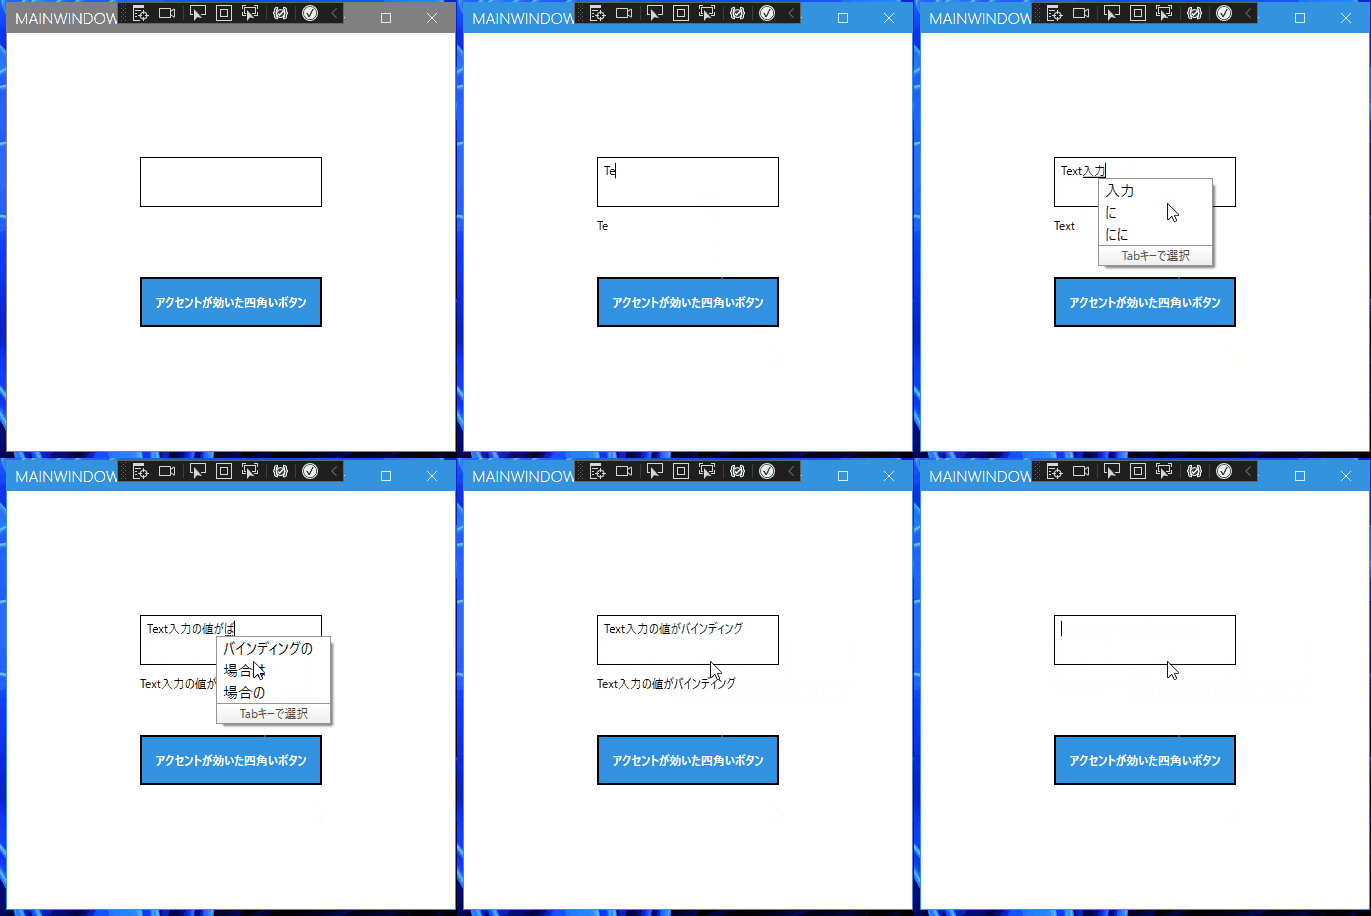
外部データを反映させる
外部から読み込んだデータを画面に反映させる処理を実装していきます。
今回はFetchTextModel.csにテキストファイルを読み込んで、その読み込んだデータを画面に反映させてみます。
まずはテキストファイルを作成します。
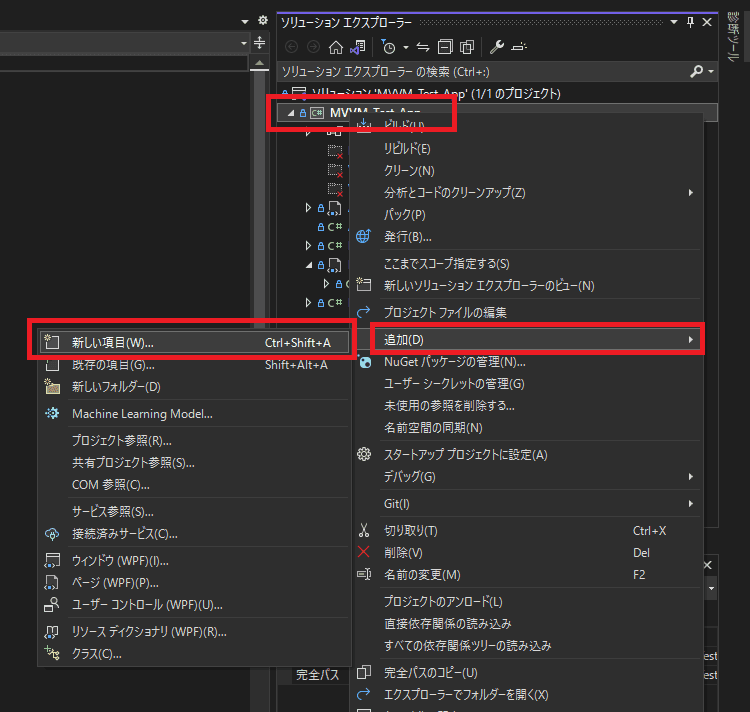
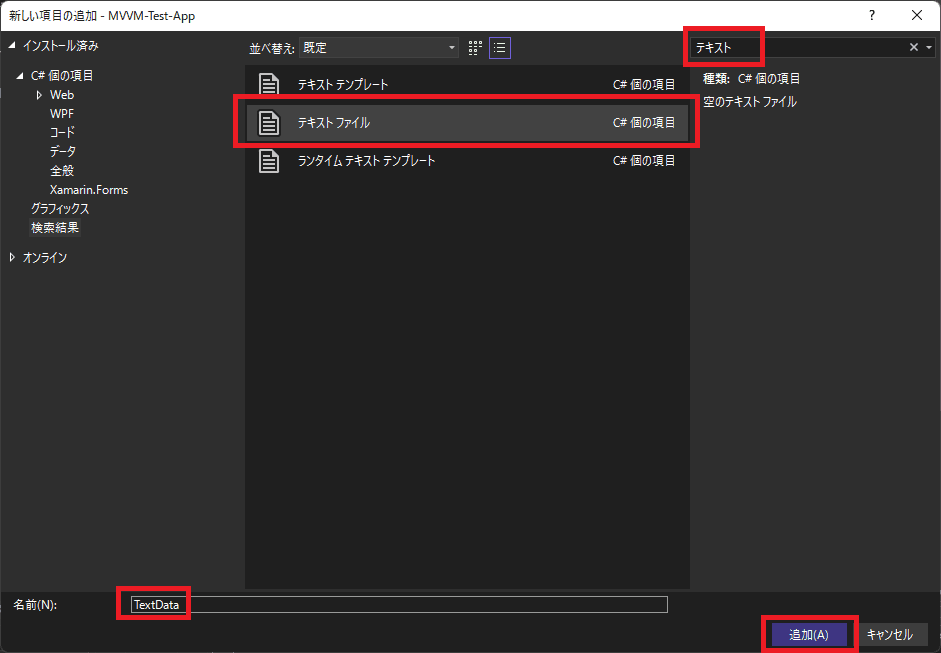
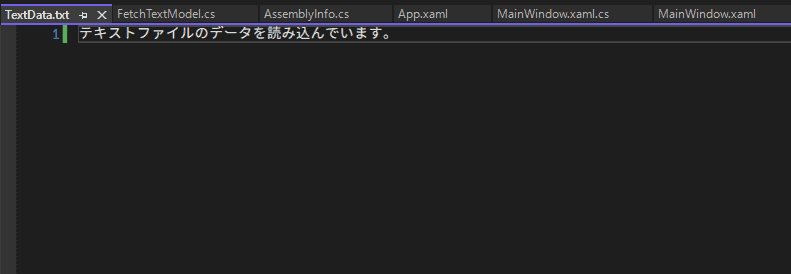
作成したテキストファイルに、適当な文字列を入力します。
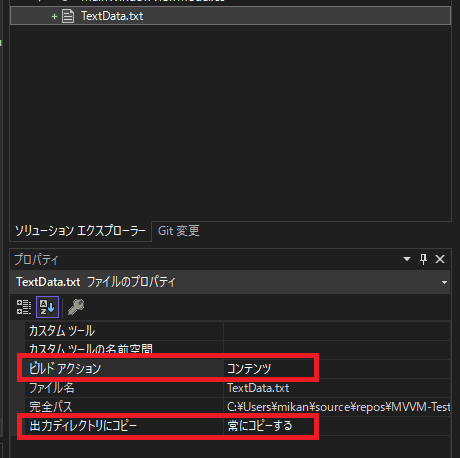
作成したテキストファイルがビルド時に作成される実行ファイル(.exe)と同一ディレクトリに出力されるように以下のように設定します。
テキストフ�ァイルを右クリック ▶ プロパティをクリック
ビルドアクションに関しての詳しい内容は本記事では割愛しますが、以下の記事が参考になりましたので参考にしてみて下さい。
次にFetchTextModel.csを以下のように修正します。
using System;
using System.IO;
using System.Text;
using System.Windows;

namespace MVVM_Test_App
{
    internal class FetchTextModel
    {
        private string _filePath;

        public FetchTextModel(string filePath)
        {
            this._filePath = filePath;
        }

        public string FetchTextData()
        {
            string text;

            try
            {
                // ファイルをオープンする
                using (StreamReader sr = new StreamReader(_filePath, Encoding.GetEncoding("UTF-8")))
                {
                    text = sr.ReadToEnd();
                }

                return text;
            }
            catch (Exception ex)
            {
                MessageBox.Show(ex.Message);

                return string.Empty;
            }
        }
    }
}
モデルからのデータ取得は、ボタンを押したときに実行するように実装します。
DelegateCommand クラスの実装
ボタンの Command プロパティなどとデータバインディングするために、ICommand インターフェースを実装した DelegateCommand クラスを作成しま��す。
using System;
using System.Windows.Input;

namespace MVVM_Test_App
{
    internal class DelegateCommand<T> : ICommand
    {
        /// <summary>
        /// コマンドを実行するためのメソッドを保持する
        /// </summary>
        private readonly Action<T> _execute;

        /// <summary>
        /// コマンドが実行可能か判定するためのメソッドを保持する
        /// </summary>
        private readonly Func<bool> _canExecute;

        /// <summary>
        /// コンストラクター。新しいインスタンスを生成します。
        /// </summary>
        /// <param name="execute">コマンドを実行するためのメソッドを指定する</param>
        public DelegateCommand(Action<T> execute) : this(execute, () => true) { }

        /// <summary>
        /// コンストラクター。新しいインスタンスを生成します。
        /// </summary>
        /// <param name="execute">コマンドを実行するためのメソッドを指定する</param>
        /// <param name="canExecute">コマンドの実行可能性を判別するためのメソッドを指定します。</param>
        public DelegateCommand(Action<T> execute, Func<bool> canExecute)
        {
            this._execute = execute;
            this._canExecute = canExecute;
        }

        /// <summary>
        /// コマンドが実行可能か状態が変化したら発火する
        /// </summary>
        public event EventHandler? CanExecuteChanged
        {
            // RequerySuggested: コマンドを実行できるかどうかを変更する可能性のある条件が、
            //                    CommandManagerによって検出された場合に発生する
            add { CommandManager.RequerySuggested += value; }
            remove { CommandManager.RequerySuggested -= value; }
        }

        /// <summary>
        /// コマンドが実行可能か判別します。
        /// </summary>
        /// <param name="parameter">この処理に対するパラメータを指定する</param>
        /// <returns>コマンドが実行可能である場合にtrueを返す</returns>
        public bool CanExecute(object? parameter)
        {
            return this._canExecute();
        }

        /// <summary>
        /// コマンドを実行する
        /// </summary>
        /// <param name="parameter">この処理に対するパラメータを指定する</param>
        public void Execute(object? parameter)
        {
            this._execute((T)parameter);
        }
    }
}DelegateCommand.cs内のコードは、また別記事で詳しく確認してい行きたいと思います。
次に、MainWindowViewModelを以下のように修正します。
using System.ComponentModel;
using System.Runtime.CompilerServices;
using System.Windows.Input; // 追加
using System.IO; // 追加

namespace MVVM_Test_App
{
    internal class MainWindowViewModel : INotifyPropertyChanged
    {
        // 追加
        public ICommand ExecuteFetchTextDataButton { get; private set; }

        // プロパティの変更時に発火する
        public event PropertyChangedEventHandler? PropertyChanged;

        private string? _textBoxValue;

        public string? TextBoxValue
        {
            get { return _textBoxValue; }
            set
            {
                // 現在の値と変更があった場合
                if (_textBoxValue != value)
                {
                    // 変更があった値をプロパティに代入
                    _textBoxValue = value;
                    // TextBoxValueプロパティに変更があったことを通知する
                    OnPropertyChanged();
                }
            }
        }

        // 追加
        public MainWindowViewModel()
        {
            ExecuteFetchTextDataButton = new DelegateCommand<object>(FetchTextData);
        }

        // 追加
        private void FetchTextData(object? obj)
        {
            FetchTextModel model = new FetchTextModel(Path.Combine(Directory.GetCurrentDirectory(), "TextData.txt"));

            string result = model.FetchTextData();

            if(result != string.Empty) TextBoxValue = result;
        }

        /// <summary>
        /// PropertyChangedEventArgsを発火させる
        /// </summary>
        /// <param name="propertyName">プロパティ名</param>
        protected virtual void OnPropertyChanged([CallerMemberName] string propertyName = null)
        {
            PropertyChanged?.Invoke(this, new PropertyChangedEventArgs(propertyName));
        }
    }
}
DelegateCommand クラスのコンストラクタでは、第一引数にコマンドとして実行する処理を、第二引数としてコマンドの実行可能判別をおこなう処理を指定します。
常に実行可能であるコマンドの場合は、コンストラクタの第二引数を省略することができます。
最後に、MainWindow.xamlを修正します。
    <!--  中略  -->
        <!--  Commandを追加する  -->
        <Button
            Grid.Row="4"
            Grid.Column="2"
            Grid.ColumnSpan="3"
            Margin="5"
            Content="アクセントが効いた四角いボタン"
            Command="{Binding ExecuteFetchTextDataButton}"
            Style="{StaticResource MahApps.Styles.Button.Square.Accent}" />
    </Grid>
</mah:MetroWindow>
ここまでで一度ビルドしてみてアプリの動作を確認します。
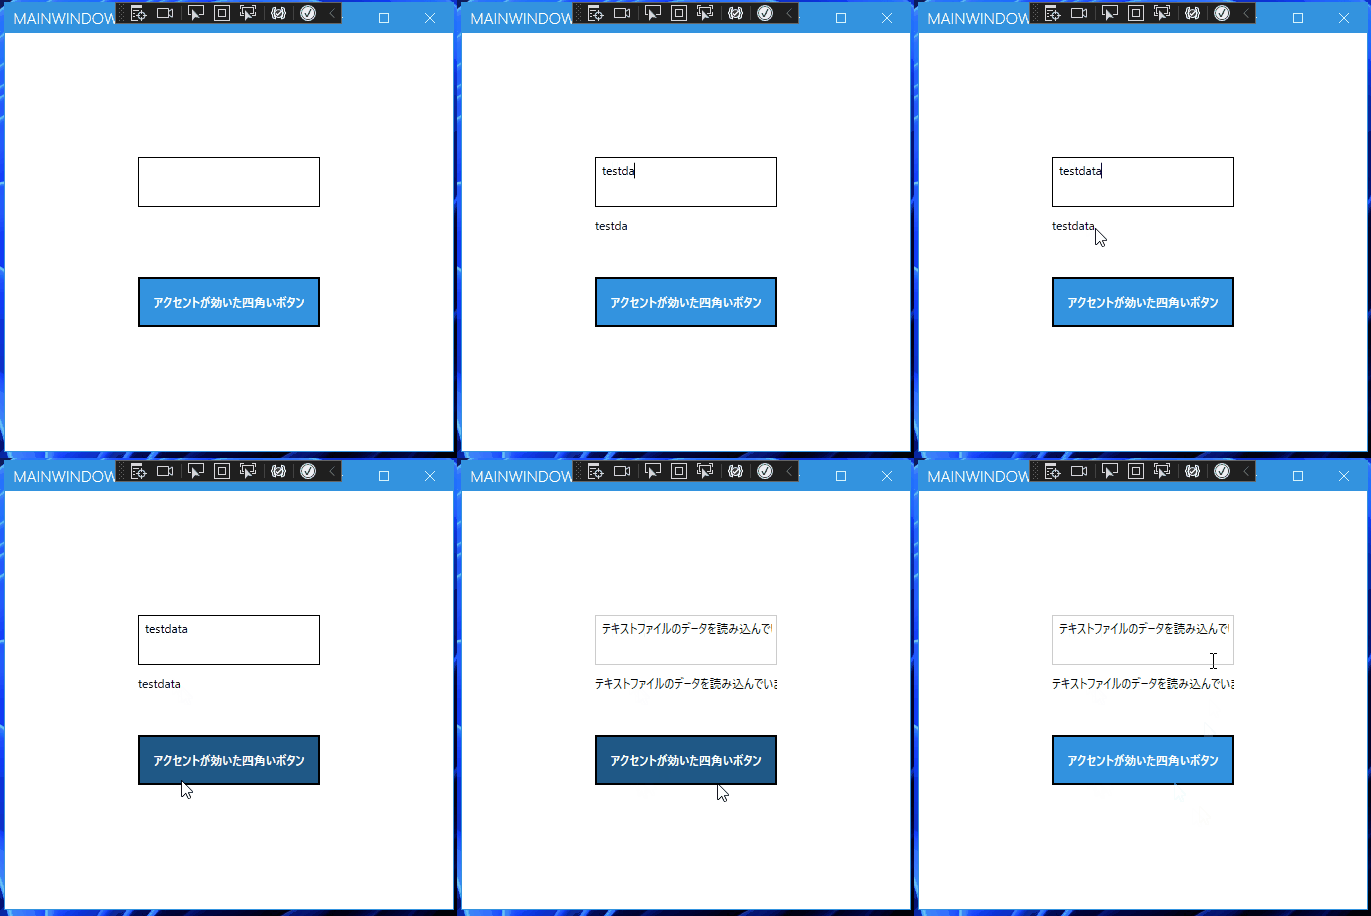
外部のテキストファイルから読み込んだデータを、View 側に反映させることが出来ました。
今回はテキストデータでしたが、これがデータベースや AIP にに変わったときも同様で、読み込んだデータをデータバインディングしているプロパティに代入すること�で画面側も即座に反映させることが出来ます。
今回作成したアプリケーションのリポジトリはこちらになります。
まとめ
- MVVM とはソフトウェアアーキテクチャの一つで、アプリケーション構造を
Model - ViewModel - Viewに大別する - プロパティ変更通知を行うためには、
INotifyPropertyChangedインターフェースをMainWindowViewModelに実装する - View 側の DataContext と ViewModel を紐づけることで、データバインディングを実現する。
