はじめに
デフォルトの WPF のデザインはすごい業務アプリっぽさがするので、デザインを何とか出来ないかと思い検索して��いたらMahApps.Metroと言うライブラリを見つけたので試して行こうと思います。
MahApp.Metro とは?
MahApps.Metro とは WPF アプリにモダンなデザインを導入できるライブラリのことです。
画像のような UI を簡単に構築することが出来ます。(公式サイトより引用)

WPF のデフォルトのデザインとは違いきれいな見た目になっているのが分かります。なお、ソースコードは GitHub に公開されています。
MahApps.Metro をインストールする
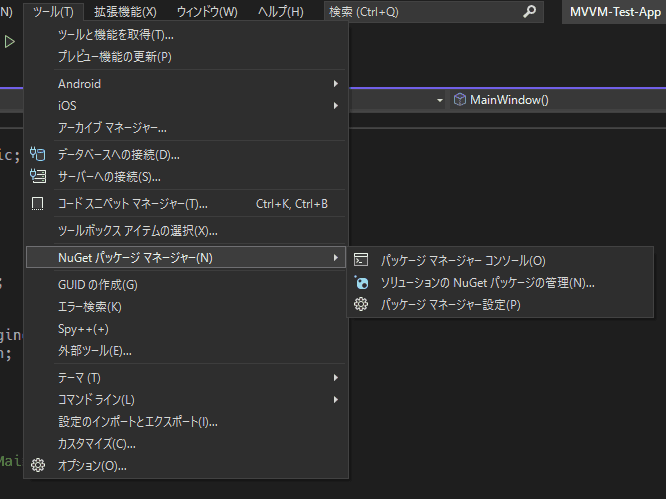
MahApps.Metroは Nuget パッケージからインストールします。
上部メニューのツール ▶ Nuget パッケージマネージャー ▶ ソリューションの Nuget パッケージの管理をクリックします。
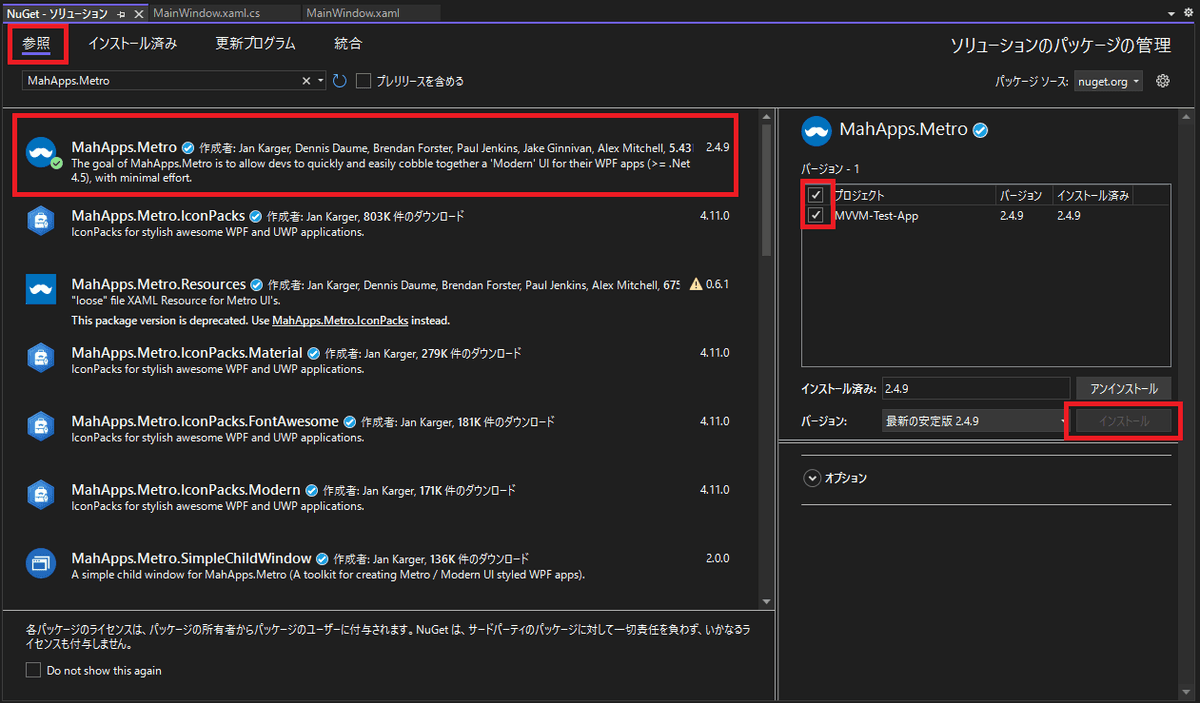
開いた画面上部の「参照」タブ ▶ 検索ボックスに「MahApps.Metro」と入力 ▶ MahApps.Metro を選択しインストールします。
デフォルトの状態を確認する
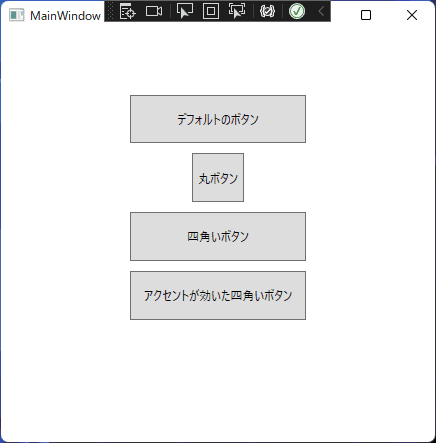
適当にボタンを配置して、MahApps.Metroを適応させる前の状態を確認します。
<Window x:Class="SampleMahApps.Metro.MainWindow"
        xmlns="http://schemas.microsoft.com/winfx/2006/xaml/presentation"
        xmlns:x="http://schemas.microsoft.com/winfx/2006/xaml"
        xmlns:d="http://schemas.microsoft.com/expression/blend/2008"
        xmlns:local="clr-namespace:SampleMahApps.Metro"
        xmlns:mc="http://schemas.openxmlformats.org/markup-compatibility/2006"
        Title="MainWindow"
        Width="450"
        Height="450"
        mc:Ignorable="d">

    <Grid Margin="32" VerticalAlignment="Center">

        <Grid.RowDefinitions>
            <RowDefinition Height="Auto" />
            <RowDefinition Height="Auto" />
            <RowDefinition Height="Auto" />
            <RowDefinition Height="Auto" />
        </Grid.RowDefinitions>

        <StackPanel Grid.Row="0"
                    HorizontalAlignment="Center"
                    Orientation="Horizontal">
            <Button Width="200"
                    Height="50"
                    Margin="5"
                    Content="デフォルトのボタン"
                    Cursor="Hand" />
        </StackPanel>

        <StackPanel Grid.Row="1"
                    HorizontalAlignment="Center"
                    Orientation="Horizontal">
            <Button Width="50"
                    Height="50"
                    Margin="5"
                    Content="丸ボタン"
                    Cursor="Hand"/>
        </StackPanel>

        <StackPanel Grid.Row="2">
            <Button Width="200"
                    Height="50"
                    Margin="5"
                    Content="四角いボタン"
                    Cursor="Hand"/>
        </StackPanel>

        <StackPanel Grid.Row="3">
            <Button Width="200"
                    Height="50"
                    Margin="5"
                    Content="アクセントが効いた四角いボタン"
                    Cursor="Hand"/>
        </StackPanel>

    </Grid>
</Window>
ビルドしてアプリの状態を確認します。
MahApps.Metro を適応させる
まずはライブラリを使用するための設定を行います。App.xamlを以下のように書き換えます。
<Application
    x:Class="MVVM_Test_App.App"
    xmlns="http://schemas.microsoft.com/winfx/2006/xaml/presentation"
    xmlns:x="http://schemas.microsoft.com/winfx/2006/xaml"
    xmlns:local="clr-namespace:MVVM_Test_App"
    StartupUri="MainWindow.xaml">
    <Application.Resources>
        <!--  ここから追加  -->
        <ResourceDictionary>
            <ResourceDictionary.MergedDictionaries>
                <ResourceDictionary Source="pack://application:,,,/MahApps.Metro;component/Styles/Controls.xaml" />
                <ResourceDictionary Source="pack://application:,,,/MahApps.Metro;component/Styles/Fonts.xaml" />
                <ResourceDictionary Source="pack://application:,,,/MahApps.Metro;component/Styles/Themes/Light.Blue.xaml" />
            </ResourceDictionary.MergedDictionaries>
        </ResourceDictionary>
        <!--  ここからまで  -->
    </Application.Resources>
</Application>次に、Mainwindow.xamlとMainWindow.xaml.csを以下のように変更します。
<!--  Windowディレクティブを mah:MetroWindowに変更する  -->
<mah:MetroWindow x:Class="SampleMahApps.Metro.MainWindow"
                 xmlns="http://schemas.microsoft.com/winfx/2006/xaml/presentation"
                 xmlns:x="http://schemas.microsoft.com/winfx/2006/xaml"
                 xmlns:d="http://schemas.microsoft.com/expression/blend/2008"
                 xmlns:local="clr-namespace:SampleMahApps.Metro"
                 xmlns:mah="http://metro.mahapps.com/winfx/xaml/controls"
                 xmlns:mc="http://schemas.openxmlformats.org/markup-compatibility/2006"
                 Title="MainWindow"
                 Width="450"
                 Height="450"
                 mc:Ignorable="d">

    <Grid Margin="32" VerticalAlignment="Center">

        <Grid.RowDefinitions>
            <RowDefinition Height="Auto" />
            <RowDefinition Height="Auto" />
            <RowDefinition Height="Auto" />
            <RowDefinition Height="Auto" />
        </Grid.RowDefinitions>

        <StackPanel Grid.Row="0"
                    HorizontalAlignment="Center"
                    Orientation="Horizontal">
            <Button Width="200"
                    Height="50"
                    Margin="5"
                    Content="デフォルトのボタン"
                    Cursor="Hand" />
        </StackPanel>

        <StackPanel Grid.Row="1"
                    HorizontalAlignment="Center"
                    Orientation="Horizontal">
            <Button Width="50"
                    Height="50"
                    Margin="5"
                    Content="丸ボタン"
                    Cursor="Hand"
                    Style="{DynamicResource MahApps.Styles.Button.Circle}" />
        </StackPanel>

        <StackPanel Grid.Row="2">
            <Button Width="200"
                    Height="50"
                    Margin="5"
                    Content="四角いボタン"
                    Cursor="Hand"
                    Style="{DynamicResource MahApps.Styles.Button.Square}" />
        </StackPanel>

        <StackPanel Grid.Row="3">
            <Button Width="200"
                    Height="50"
                    Margin="5"
                    Content="アクセントが効いた四角いボタン"
                    Cursor="Hand"
                    Style="{StaticResource MahApps.Styles.Button.Square.Accent}" />
        </StackPanel>

    </Grid>
</mah:MetroWindow>using MahApps.Metro.Controls; // 追加
namespace MVVM_Test_App
{
/// <summary>
/// Interaction logic for MainWindow.xaml
/// </summary>
public partial class MainWindow : MetroWindow // window を MetroWindow に変更する
{
public MainWindow()
{
InitializeComponent();
}
}
}ここまでで一度ビルドしてアプリの UI を確認してみます。
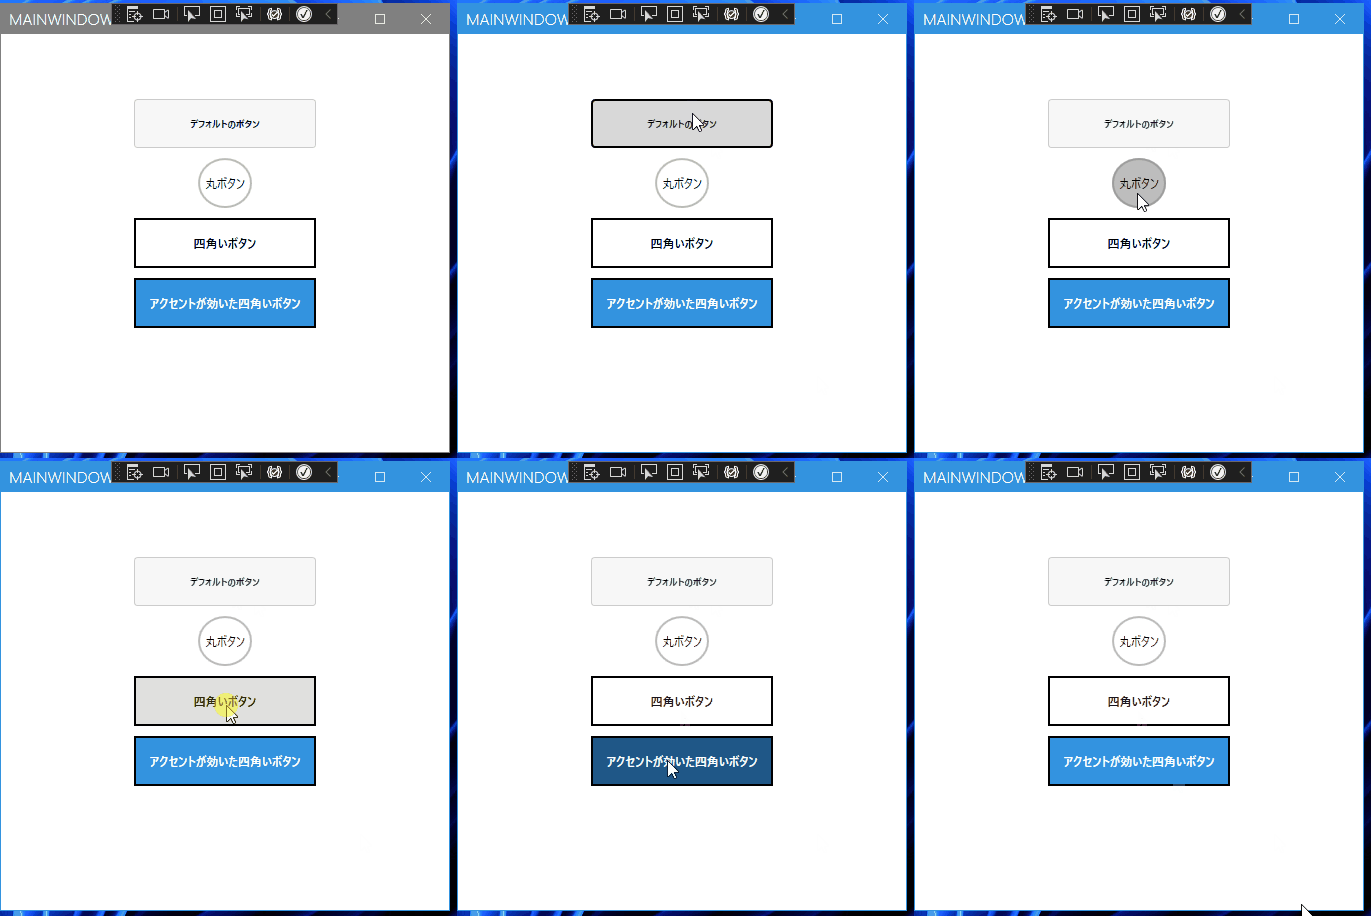
デフォルトのボタンも若干変化していることがわかります。
このように、自分で実装したら手間のかかるデザインも簡単に変更することが出来ます。
その他のデザインは公式サイトを参考にしてください。coming soonとなっている箇所もありましたが、大抵のものはドキュメントを見ながら実装できると思います。
今回作成したアプリのGitHub リポジトリです。
まとめ
MahApps.Metroを使用することで、簡単にオシャレな UI を導入することが出来ました。
UI フレームワークっぽさは出てしまうと思いますが、少ない工数で導入することが出来ますので試してみては如何でしょうか。
